ELT Connections
Within our platform, a connection acts as a dedicated data pipeline, establishing a link between a single source and a single destination. Each connection allows you to define how often data is pulled (schedule) and what specific data is transferred (streams).
The Connections tab serves as your central location for managing your data pipelines. Here you can:
- View Existing Connections: Gain a comprehensive overview of all your established data connections.
- Edit Connections: Modify settings for existing connections, such as adjusting the pull schedule or data streams.
- Create New Connections: Add new data connections by connecting sources to your desired destinations.
Create new connection
Step 1 - Connection Setup
-
Navigate to the "Connections" tab within your platform.
-
In the top right corner, click the "Create Connection" button.
-
Select the data source you want to connect, you can choose an existing source or add a new one.
-
Once you've selected your data source, choose the destination where you want the data to be loaded.
-
Follow the connection setup form which allows you to customize how your data is imported and organized:
-
Set a Pull Schedule: Determine how often your data will be retrieved from the source (e.g., hourly, daily, etc.).
- You can also use a custom schedule by configuring a cron value to specify exactly when and how often your connection will run
-
Set Up Backfill period : Specify a timeframe to import historical data along with your ongoing data stream.
infoStream Cursor and Backfill days How the Logic Works:
-
Each stream (or table) within a connection has a cursor, which acts as a checkpoint indicating where the next data run should begin.
-
Cursor Reset: After each run, the cursor is updated to "today - BACKFILL_DAYS".
Example: If BACKFILL_DAYS = 2 and a run completes on March 10th, the cursor is set to March 8th. On the next run (March 11th), data will be pulled from March 8th to March 11th (partially), covering approximately 3.5 days.
Adjusting the Backfill Window: To reduce the amount of data processed, decrease the BACKFILL_DAYS. Changes take effect after one more run.
Example: Setting BACKFILL_DAYS = 1 means each run will process ~2.5 days of data instead of 3.5.
Note - different sources apply different limitations on backfills.
- Destination-Specific Configurations: according to your selected destination, you migh need to specify additional settings.
- Select schema migration policy: Control how Extract will handle schema changes from the source
- Click "Continue Setup"
-
Step 2 - Data Streams Configuration
After saving your connection settings, head over to the "Streams" tab (located on the top bar) and Select the specific data streams (subsets of data) you want to import from the source.
Data Streams Selection: you can select which data streams you want to include in your connection. However, some streams depend on other streams due to shared primary keys. If a dependent stream is selected, its parent stream must also be included to ensure data integrity and proper relational mapping.
For each data stream, you can easily configure the following settings:
- Extract mode: This mode defines how data is retrieved from the source.
- Load mode: This mode determines how the extracted data is delivered and stored in the destination.
- Field Selection: You can define which fields to include in your data stream based on your requirements
Note - each source and destination applies differnt limitations on the possible load and extract modes.
Step 3 - Initiate your first run
- Click the "Initiate First Run" button located in the upper right corner of the screen.
- This will initiate your first conection run, according to your connection settings and streams selection.
Check our our logs under the connection "Runs" tab, where you can see exactly what API calls we’re making, how we’re interacting with databases, how we’re parallelizing tasks, and how long it takes for every single step of the pipeline to run.
View Connections
The Connections tab displays key information for each connection:
- Source - the associated source
- Destination - the destinations which the source syncs to.
- Status: the current operational state of your connection.
- Enabled - Indicates whether your data source connection is currently active and pulling data.
- Schedule - the pull schedule as configured in the connection
- Last Successful Run - indicates when was the latest successful run of the connection
- Record this month - the total volume of records synced from this source to the destination within the current month.
Connection Status
| Status | Definition |
|---|---|
| Setup | This connection has been created but hasn't started syncing data yet |
| Live | This connection is successfully transferring data from the source to the destination according to the defined schedule. |
| Error | The connection is currently unable to pull data due to an error |
Edit a connection
Click the "Edit" button next to the desired connection to access the setup form. This allows you to make any necessary adjustments to your connection configuration.
⚠️ Important: Updates made at the source level—such as updating credentials or modifying custom reports—will not automatically apply to existing connections.
To ensure your streams reflect the latest changes, you must either:
Re-save the connection, or use the "Refresh" button in the Streams tab to manually update them
Load and Extract Modes
Our platform offers flexibility with various combinations of extract and load modes, allowing you to tailor data movement to your specific needs. This section will explain each mode, the allowed combinations, and provide examples of how the data looks under different configurations.
Extract Modes
- FullRefresh
-
How it works: Retrieves the entire dataset during every sync because the source doesn’t support modification tracking.
-
Behavior: You'll always have a complete and up-to-date snapshot, but deleted records may reappear unless deletion logic is handled.
-
Use Case: Recommended for static or semi-static datasets like configuration tables, reference lists, or any source that lacks modification timestamps.
- IncrementalChanges
-
How it works: Syncs only new or updated records using a reliable timestamp field (e.g., updated_at).
-
Behavior: Keeps data fresh and current with minimal load, but relies on accurate timestamps to avoid missing changes.
-
Use Case: Ideal for frequently updated data such as user activity, transactional metadata, or business records with reliable timestamp fields.
- Partition
-
How it works: Extracts data in sliding time windows (e.g., last 7 days) to account for delayed updates and retroactive changes.
-
Behavior: Ensures recent time-series data stays fresh, but historical data remains unchanged unless manually backfilled.
-
Use Case: Best for time-based reporting data like ad performance metrics, attribution reports, or any dataset that gets updated retroactively.
Load Mode Types and Extract Mode
Append
- Supported Extract Modes: Any (
FullRefresh,IncrementalChanges,Partition) - Table Structure: Standard table with your data columns only
- Behavior: Simple
INSERToperation - adds all new data to the table - Primary Key: Optional
- Use Case: Continuously add new records without modifying existing ones
Replace
-
Supported Extract Modes:
FullRefresh,Partitiononly -
Table Structure: Standard table with your data columns only
-
Behavior:
FullRefresh: Truncates entire table and replaces with new dataPartition: Deletes matching partition data and inserts new data
-
Primary Key: Optional for FullRefresh, partition keys required for Partition
-
Use Case: Full refresh scenarios or partition-based overwrites
Upsert
- Supported Extract Modes:
IncrementalChangesonly - Table Structure: Standard table with your data columns + requires primary key
- Behavior: Updates existing records or inserts new ones based on primary key conflicts
- Primary Key: Required - defines the conflict resolution key
- Use Case: Incremental updates where you want to merge changes
History
-
Supported Extract Modes:
IncrementalChangesonly -
Table Structure: Your data columns + 3 special tracking columns:
_extract_active(BOOLEAN) - indicates if this is the current version_extract_start(TIMESTAMPTZ) - when this version became active_extract_end(TIMESTAMPTZ) - when this version was superseded (NULL for current)
-
Primary Key: Original primary key +
_extract_starttimestamp -
Behavior: Implements Slowly Changing Dimension Type 2 (SCD2)
-
Use Case: Track historical changes to records over time
SoftDelete
-
Supported Extract Modes:
FullRefreshonly -
Table Structure: Your data columns + 1 special tracking column:
_extract_deleted(BOOLEAN) - indicates if record was deleted
-
Behavior: Marks all existing records as deleted, then upserts new data
-
Primary Key: Required for conflict resolution
-
Use Case: Full refresh while maintaining a record of what was deleted
Important Note
Currently, once a table exists in the destination (after the first connection run ennded successfully), it is not possible to change the load mode or migrate to a new load mode.
Schema Migrations
Schema migrations occur when the structure of data changes in the source or when a user modifies the schema configuration in the ELT platform. These changes can affect how data is stored and processed in the destination database.
Our platform provides a self served Schema Migration Policy that users can configure under Connection Settings at the connection level. This policy determines how schema changes are handled during data synchronization.
Schema Migration Policy Options
You can choose from the following schema migration options:
-
Auto-activate new streams – New streams discovered in the source will be automatically enabled and synced to the destination.
-
Add new fields – New columns will be created in existing tables when new fields are detected.
-
Deprecate old fields – Columns no longer used by the source will be marked as deprecated by renaming them.
Platform Behavior During Schema Migrations
Different types of schema changes result in different behaviors in the platform:
| Schema Change | Behavior |
|---|---|
| New field selected by the user | The field will be added to the destination table at the next connection run. |
| New field added by the source | The field will be added only if "Add new fields" is enabled in the schema migration policy. Otherwise, it will be ignored. |
| Field deselected by the user | The field remains in the destination database, but we stop populating values in this column. |
| Field deprecated by the source | If "Deprecate old fields" is enabled, the column will be renamed. Otherwise, it behaves the same as a deselected field (stays in the database but is no longer populated). |
Backfill Options
When new streams or fields are introduced, the platform does not automatically backfill them. However, users have the following options to backfill data:
-
Selective Stream Backfill – You can modify the stream selection to include only the relevant streams that have newly added fields and run a one-time manual sync. This will trigger a connection run based on your settings for the selected streams. Important: Once the backfill is complete, ensure you update the stream selection to include all previously selected streams.
-
Customized Runs – You can initiate a one-time customized run using the customized runs feature. Note that this will run the entire connection and not specific streams.
Schema Changes Tab
The Schema Changes tab provides transparency and a visual representation of schema modifications for a given connection.
Changes types:
- Stream Added = a new stream was added by the source
- Stream Deleted = a stream was deprecated by the source
- Field Added = a new field was added by the source
- Field Deleted = a field was deprecated by the source
- Field Selected = a new field was selected by the user
- Field Deselected = a field was deselected by the user
Status Definitions:
-
Not Run – The stream has not been executed yet, so the change has not been applied.
-
Skipped – The change was ignored due to the schema migration policy settings.
-
Applied – The change has been successfully implemented.
Connection Runs
In the Connection Run tab, you can view a summary of all your connection runs, including important details such as:
- Start Time: The time when the connection run started.
- End Time: The time when the connection run ended.
- Duration: The total time taken for the connection run to complete.
- Amount of Records: The number of records processed during the connection run.
- Status: The current status of the connection run (e.g., Success, Partial Success, Failuer, In Progress).
Detailed Logs
Extract provides the highest level of transparency in its inner workings. You can see exactly what API calls we’re making, how we’re interacting with databases, how we’re parallelizing tasks, and how long it takes for every single step of the pipeline to run.
Logs Format
Our logs follow this format:
[DATE] - [MESSAGE LEVEL] - [COMPONENT] - [STREAM] - [MESSAGE]
- Message level: INFO, WARNING, ERROR
- Component: SOURCE, DESTINATION, CONNECTION, LOGINV
- Stream: Stream name if applicable
- Message: Varies depending on the source and destination
Running Connections Manually
Our platform provides the flexibility to manually run connections outside of the scheduled times. To manually run a connection, click the Run Now button at the right top corner. This action will execute the connection run according to the current stream selection and connection configurations.
In addition, you can also use our Customized Runs feature to configure an historical backfill in case you need to refresh any of your data without having to wait to the scheduled runs.
Customized Runs
Customized runs are manual runs that allow you to specify particular streams and time ranges for the data transfer. Here’s how to use customized runs:
-
Navigate to the Connection .
-
Select the dropdown next to the Run Now button.
-
Select the Customized Run option.
-
Choose the specific streams and time ranges you want to include in the run.
-
Execute the run. Note that customized runs are one-time runs and will override the stream selection for this specific execution only. All other settings, such as load and extract modes, will remain the same.
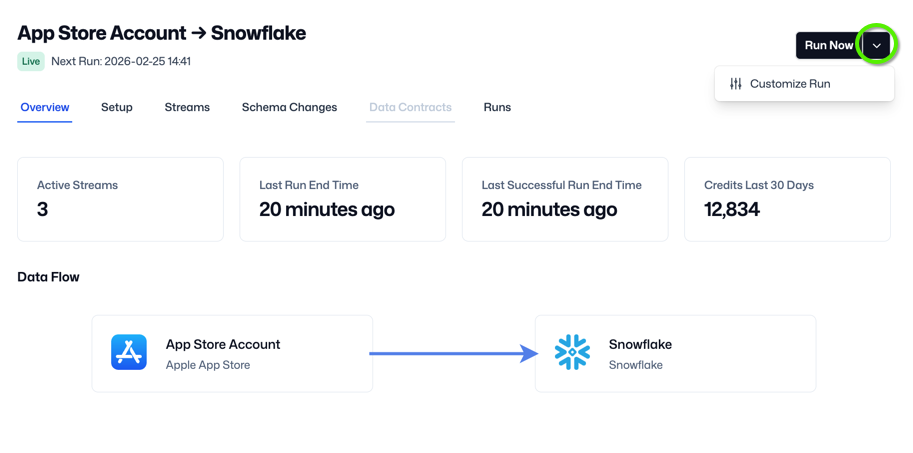
Currently, customized runs are only supported for streams with date partitions. Streams using incremental updates are not supported.
FAQ
Can I set different pull schedules for different streams?
Pull schedules are set at the connection level. However, you can create multiple connections, each with a different pull schedule, and configure the relevant streams within each connection.
Can I run historical backfills outside of the connection schedule?
You can use our Customized Runs feature to configure an historical backfill in case you need to refresh any of your data without having to wait to the scheduled runs.
Is there a retry mechanism if the connection fails?
Yes, our platform will attempt to re-run the connection up to 10 times as follows:
Initial attempt
- Retry 1 (1 minute after the previous attempt)
- Retry 2 (10 minutes after the previous attempt)
- Retry 3 (20 minutes after the previous attempt)
- This pattern continues accordingly.
However, the original schedule remains intact. This means that even after one scheduled failure and 10 retries, the connection will continue to run on its regular schedule indefinitely.
How can I determine when my connection will run next?
See the exact time of your next scheduled run in the connection settings page, next to the status indication. The timestamp is displayed in your local timezone, allowing you to know precisely when the next data sync will occur
The timing of the next connection run depends on the schedule you’ve set for your connection:
- Custom Schedule: The next run is determined by the crontab expression you’ve configured.
- Daily: Runs 24 hours after the last connection run (either scheduled or manual).
- Hourly: Runs 1 hour after the last connection run (either scheduled or manual).
- Every X Hours: Runs X hours after the last connection run (either scheduled or manual).
Notes:
-
For "fixed" schedules (Daily, Hourly, Every X Hours), any manual run will reset the scheduler, and the next run will be calculated based on the time of the manual run.
-
For Custom crontab schedules, the system will also take into account whether the previous run has completed. Example for a crontab set to run every 5 minutes:
- At 10:00 AM, the run starts, and the next run is scheduled for 10:05 AM.
- The run takes 20 minutes to complete, so the next run starts at 10:20 AM.
- The next schedule is then set to 10:25 AM.
- This time, the job takes 2 minutes to complete, so it starts again at 10:25 AM, and the next run is set for 10:30 AM.
- This pattern continues accordingly.
What timezone is used for connection runs?
By default, all connection runs are scheduled in UTC timezone.
What happens if I disable a data stream?
If you disable a data stream, the stream’s cursor will retain the last date used to pull data. When you re-enable the stream, the next connection run will resume from that point, ensuring no data is lost or duplicated.
Why am I not seeing the changes I made to my custom reports?
Changes made at the source level—such as updating custom reports or credentials—do not automatically apply to existing connections.
To see the updated custom reports in your connection, you need to either:
Re-save the connection, or use the "Refresh Streams" button available in the Streams tab to manually update the list of streams.