Amazon Redshift
Singular can connect to Amazon Redshift as:
- a Destination (load data into Redshift by staging files in S3 and issuing Redshift
COPYcommands), and - a Source (extract data from Redshift using a Postgres-compatible connection).
Prerequisites
For Redshift as a Destination
- Admin access to your Redshift instance for
CREATEandGRANTSQL commands - Admin access to your AWS Console to change your Redshift cluster's security groups
- An S3 bucket accessible to Redshift for
COPY(either Singular-hosted or your own)
For Redshift as a Source
- Network access from Singular to your Redshift cluster (security group inbound rules)
- A Redshift user with permission to read the schemas/tables you want to extract
- Connection details (host, port, database, username/password)
- A list of datasets to extract (see Source configuration)
Setup Guide (Destination)
Step 1 - Create a redshift user for Singular to access
Connect to your redshift database with an admin account and run the following commands:
CREATE USER singular WITH PASSWORD '<password>';
This command creates a user in your redshift database called singular with the password you set.
Step 2 - Create a database, or grant access to an existing database
You can either create a separate database for the Singular integration:
CREATE DATABASE "<DATABASE NAME>" WITH OWNER singular;
Or utilize an existing database, switch to that database and grant access to Singular:
GRANT CREATE ON DATABASE "<DATABASE NAME>" TO singular;
GRANT SELECT ON ALL TABLES IN SCHEMA information_schema TO singular;
GRANT SELECT ON ALL TABLES IN SCHEMA pg_catalog TO singular;
Step 3 - Configure access
Your Redshift Cluster has an AWS Security Group setting that controls which hosts are allowed to connect to it. In this step we will provide add Singular's servers to your security group.
-
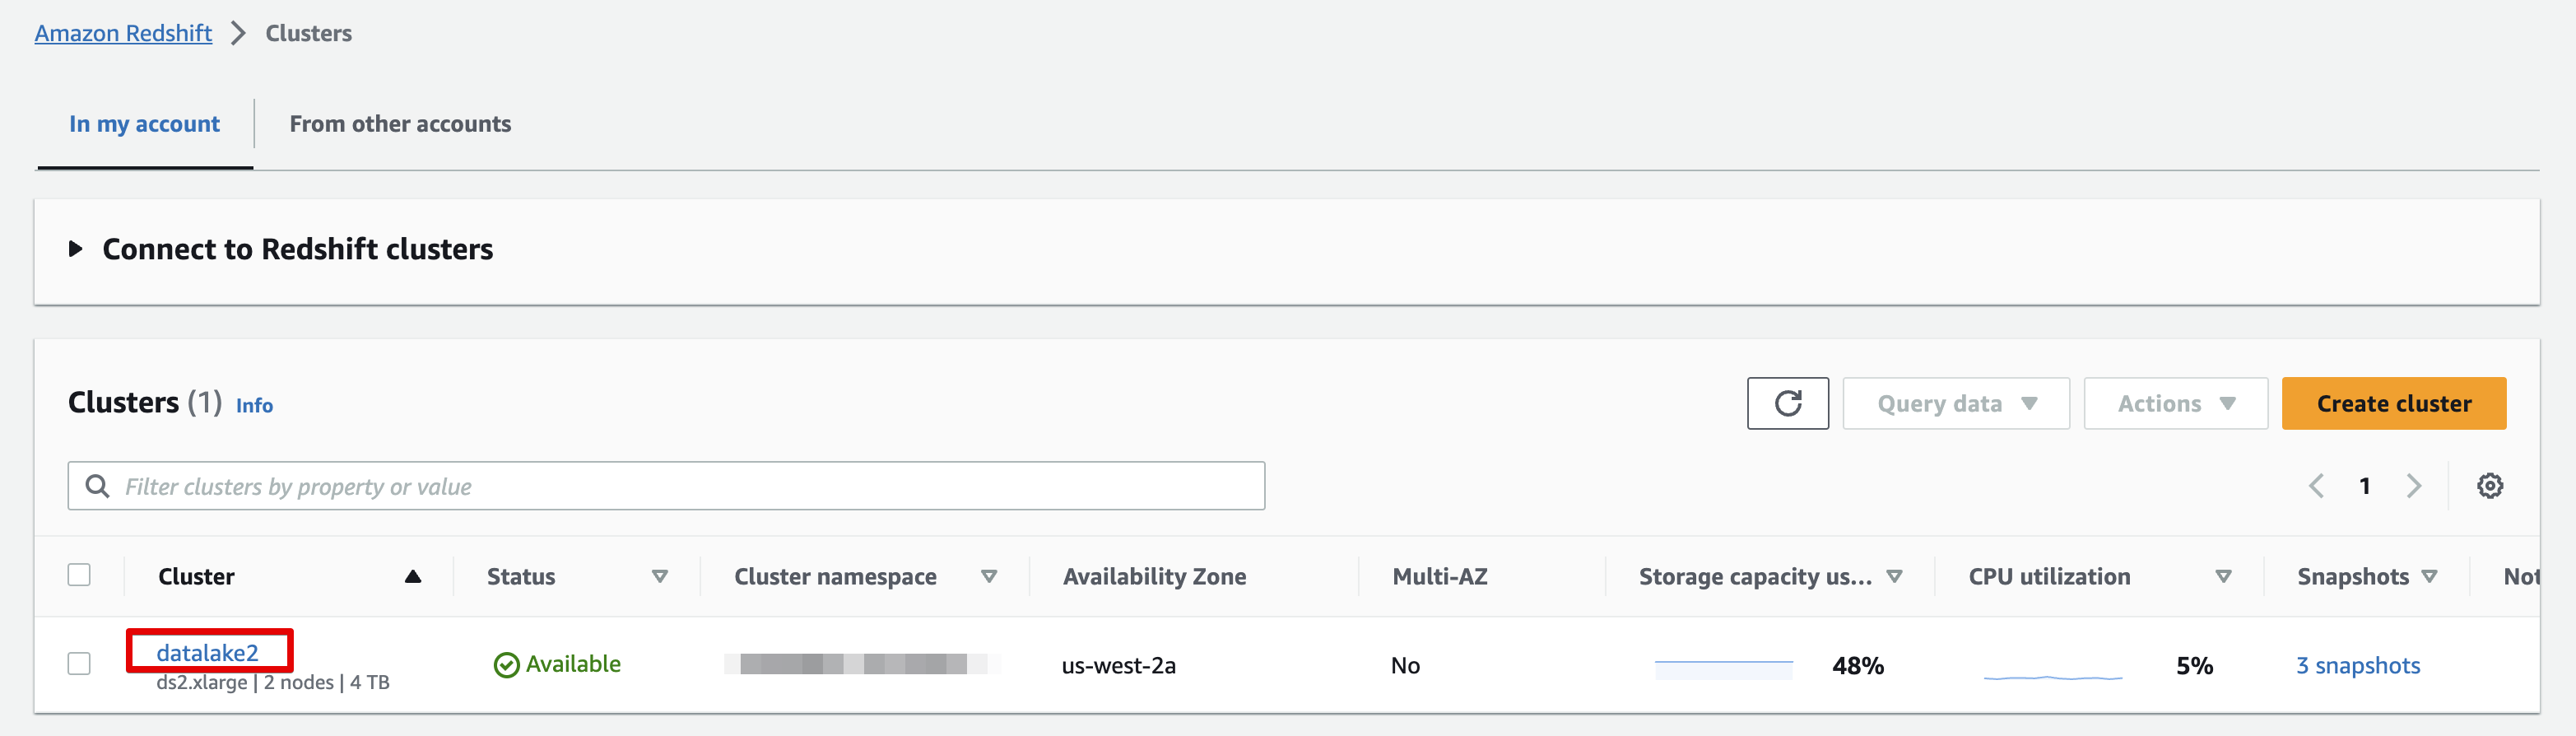
Login to your AWS Console, go to the Amazon Redshift page, and click on your redshift cluster:
-
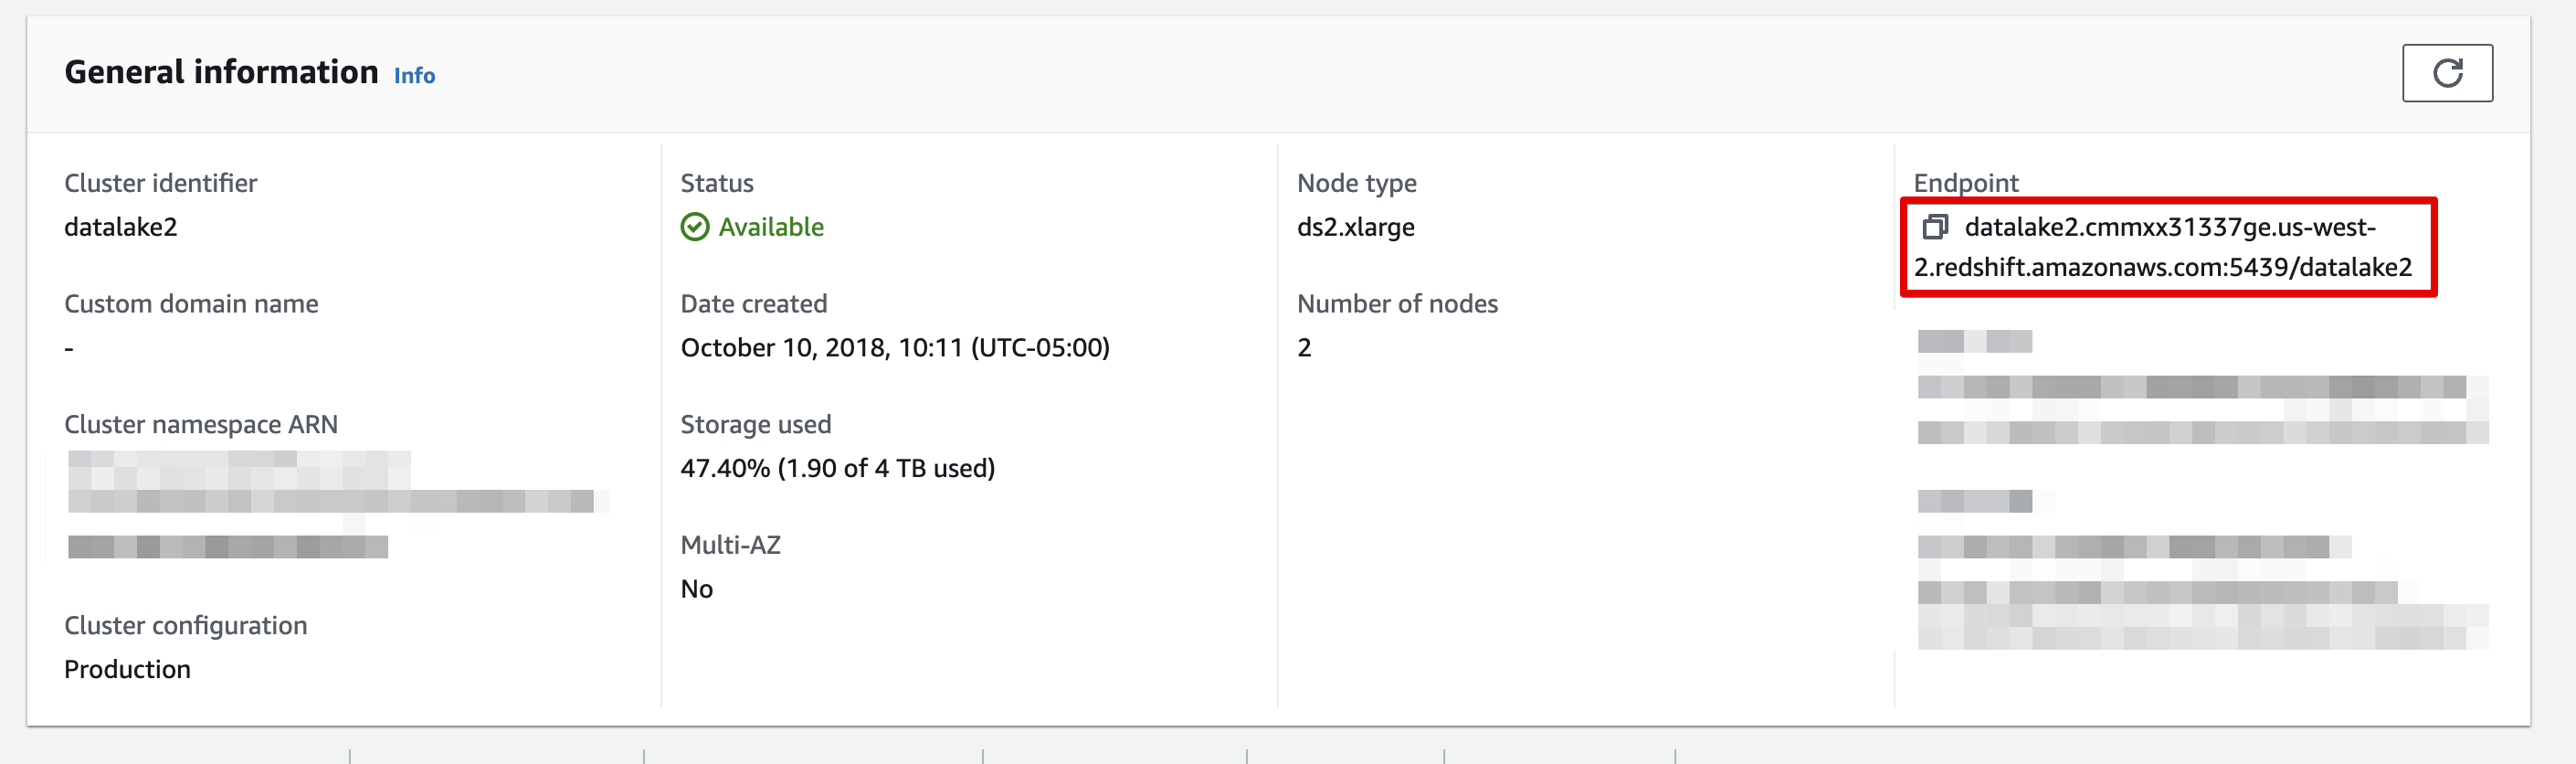
In the General Information panel, copy the endpoint, and write it down.
-
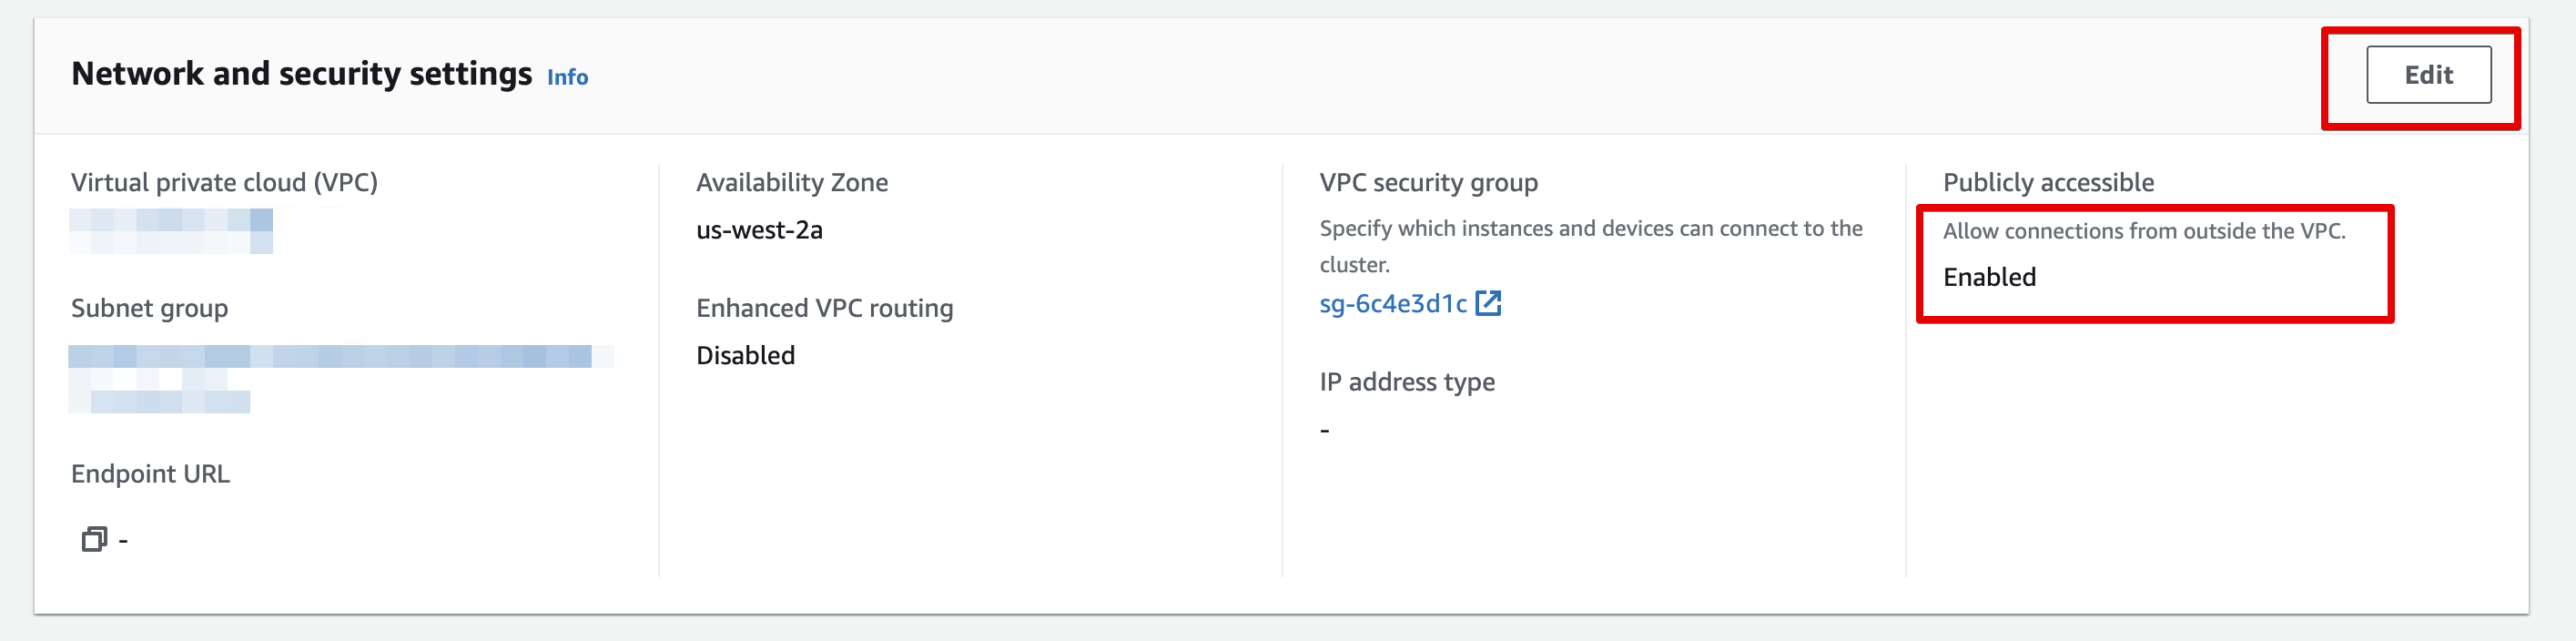
Scroll down to Network and security settings and:
- Make sure the cluster is Publicly accessible
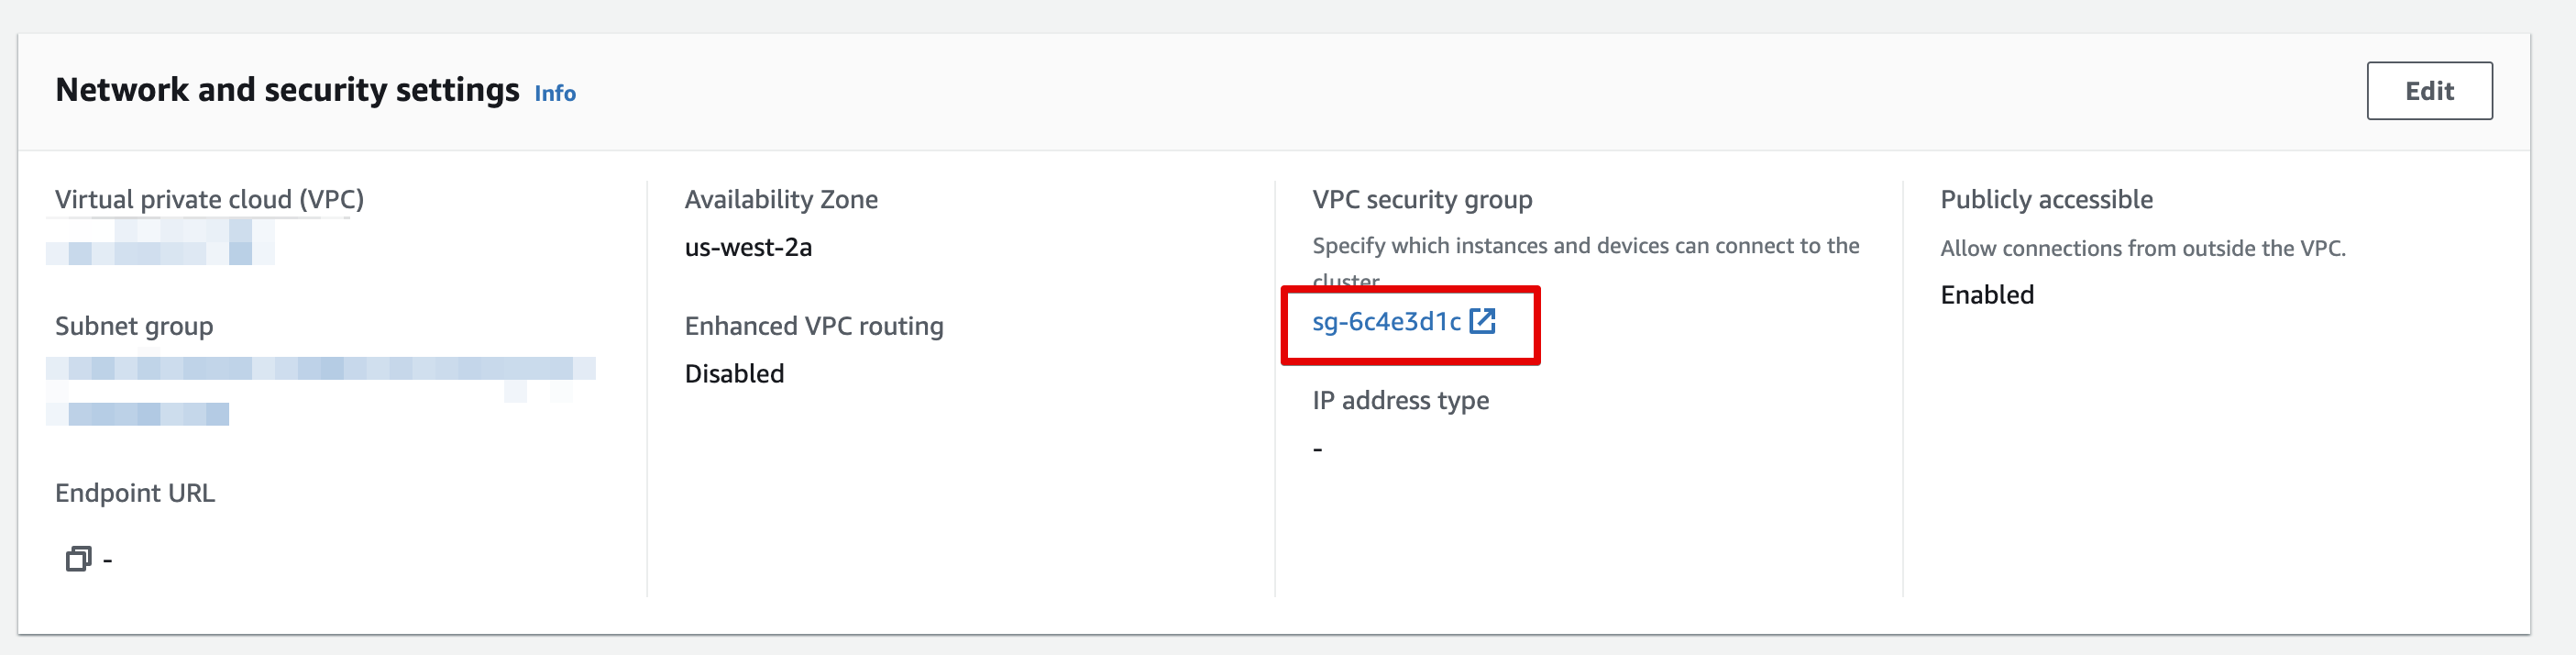
- Click on the VPC security group link to configure
- Make sure the cluster is Publicly accessible
-
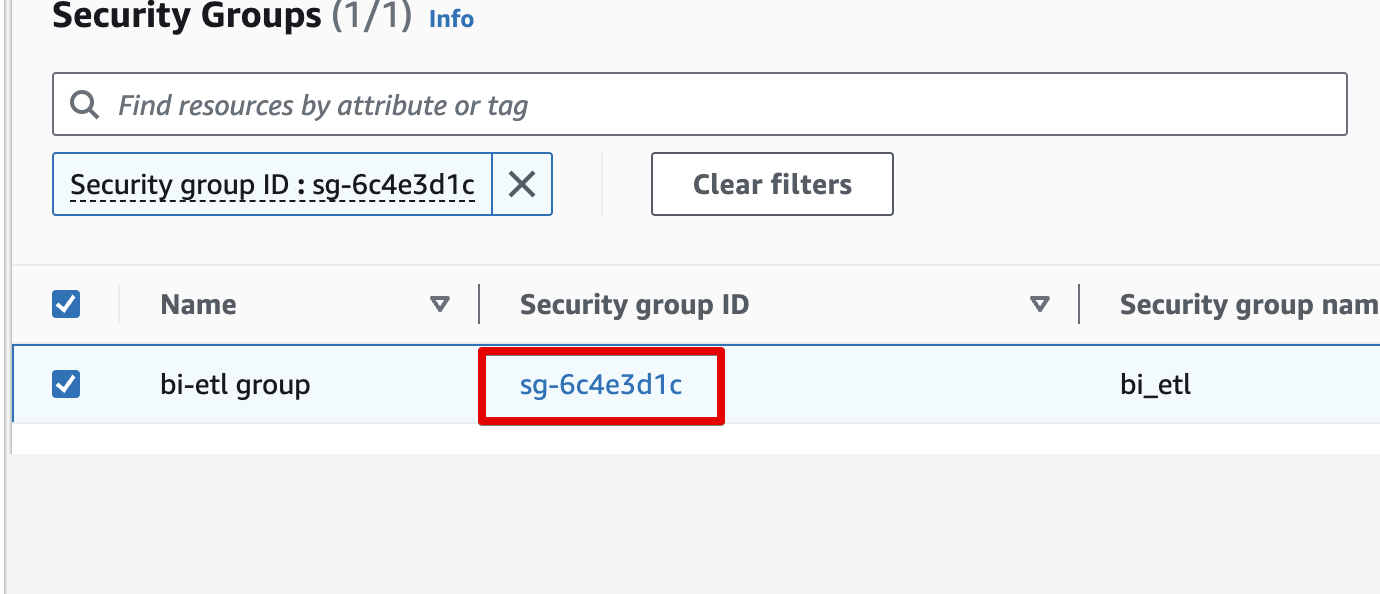
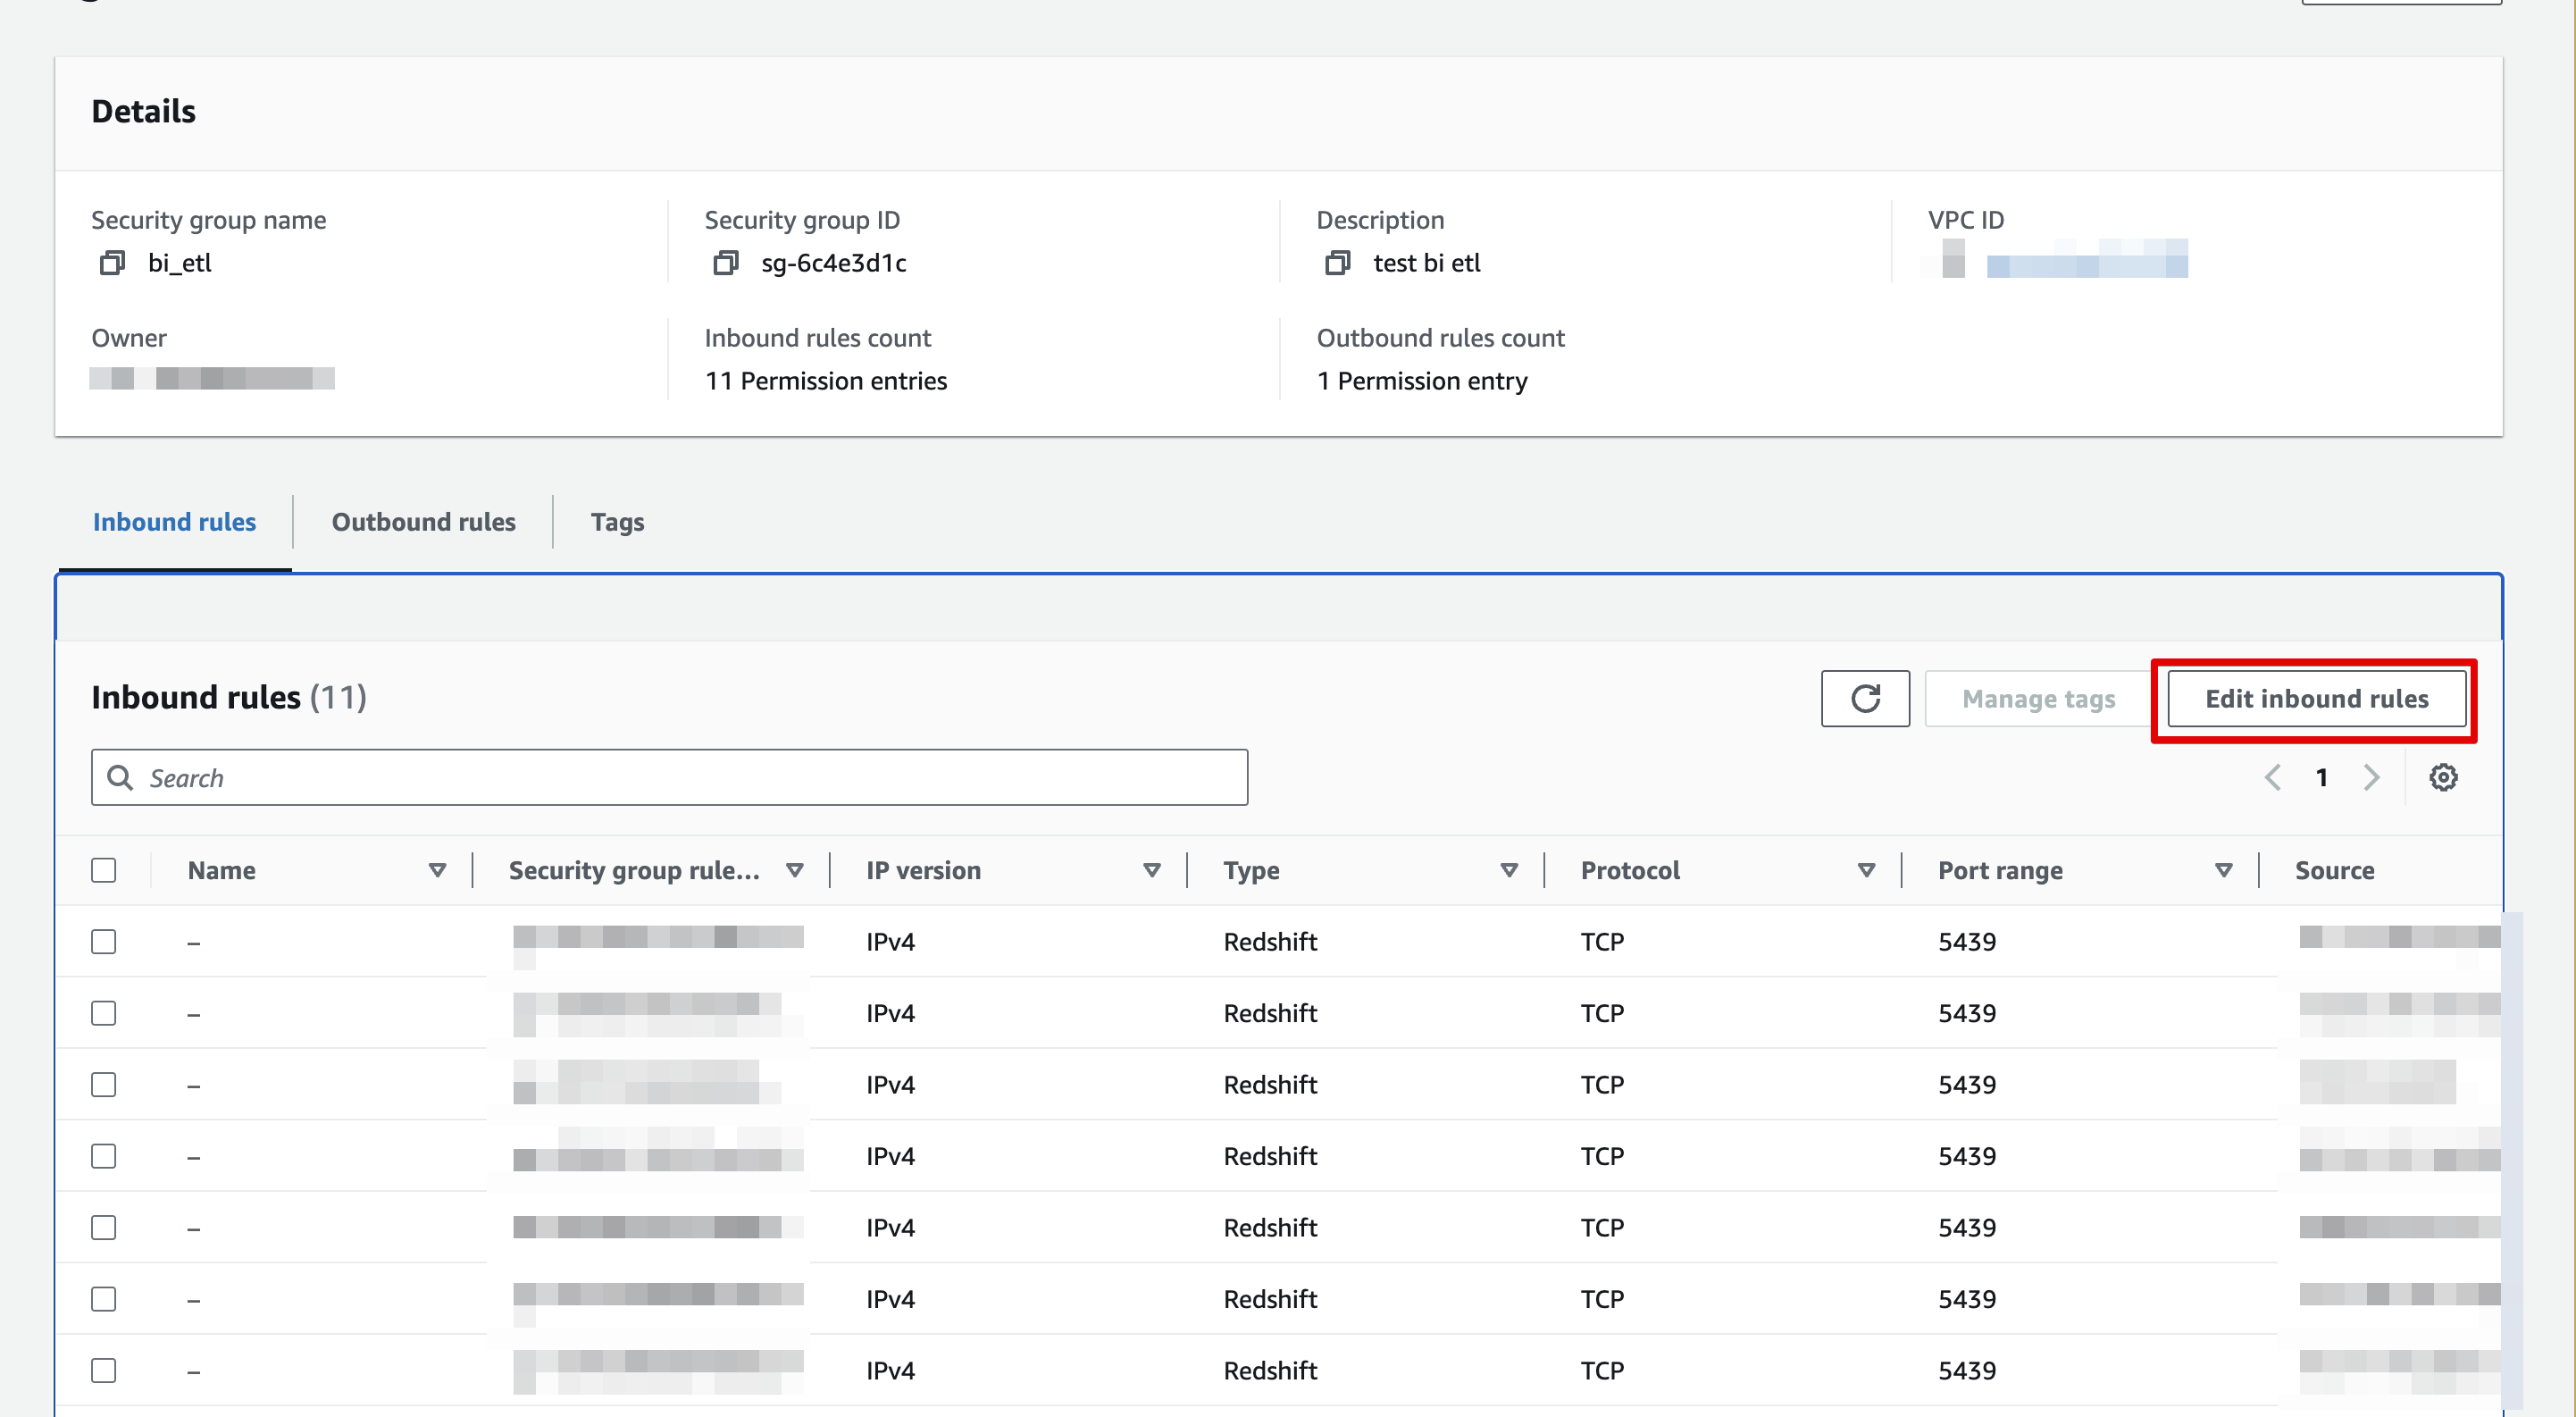
Select the security group in the list, and then click on Edit Inbound rules
-
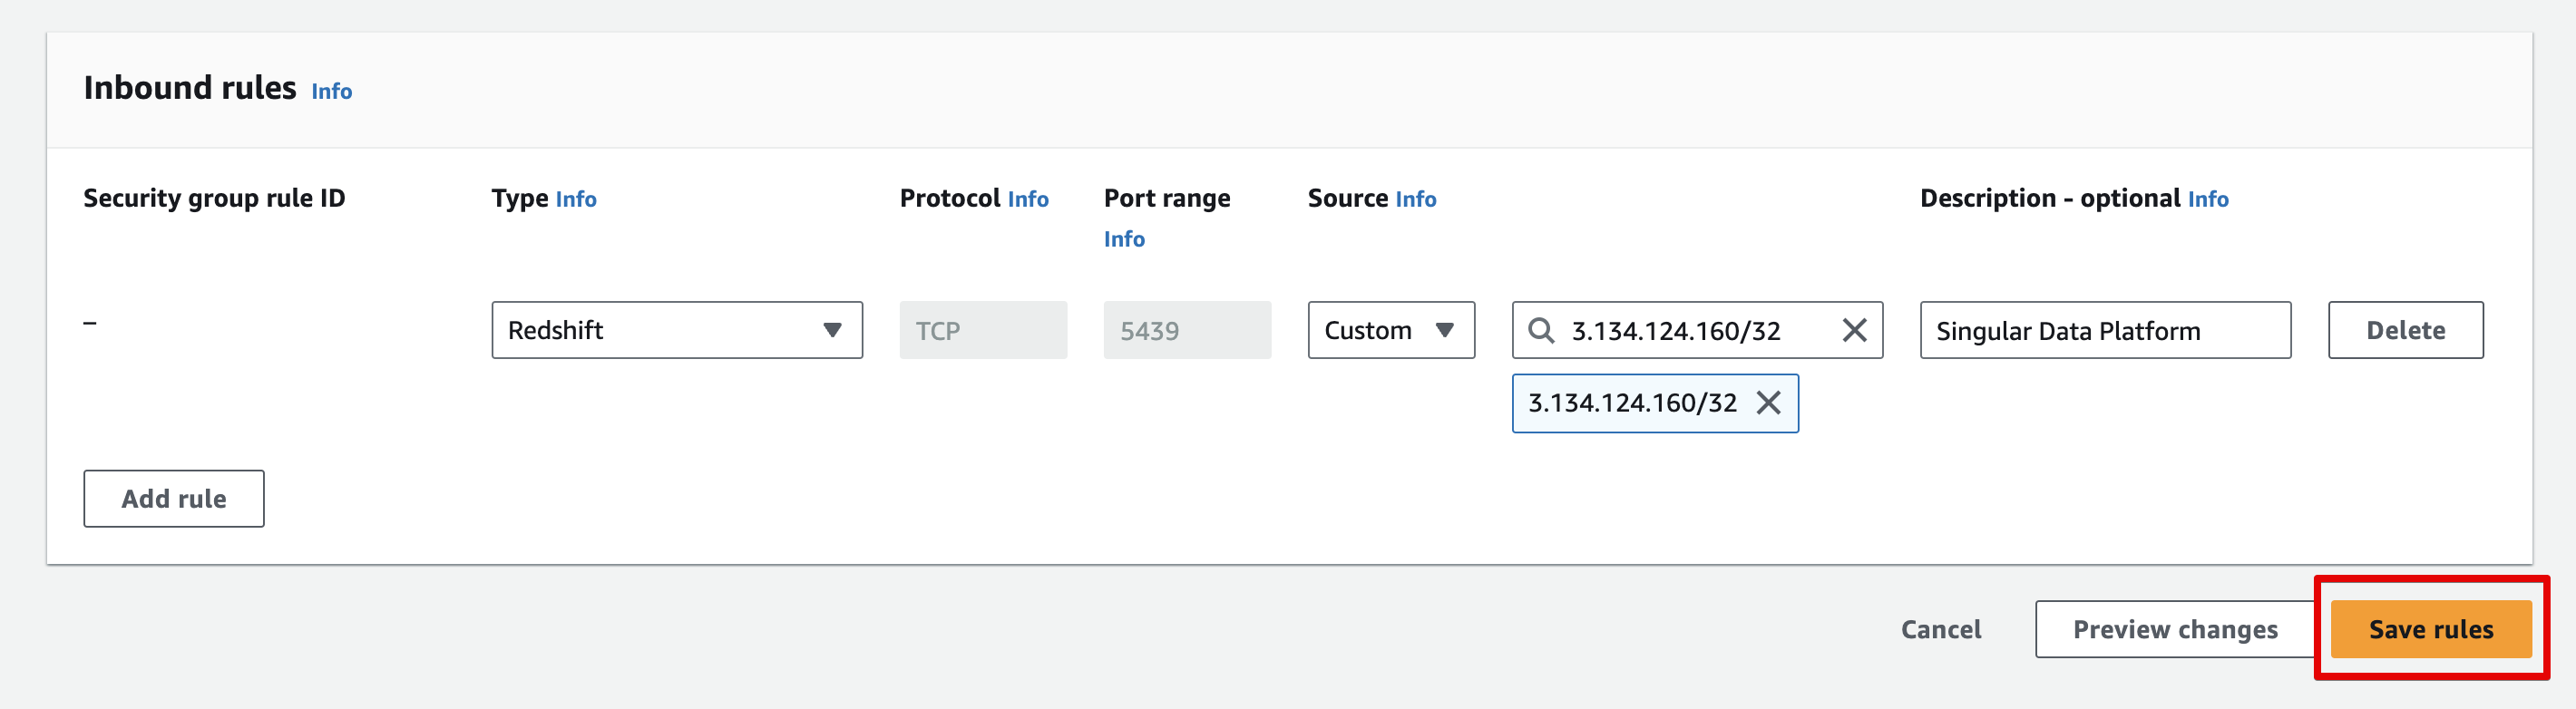
Whitelist the following IPs:
3.134.124.160/323.150.64.207/3244.232.26.19/3254.214.149.234/32
Step 4 - Configure the connector
Provide the Redshift connection details and S3 staging configuration in the connector setup.
Connection fields
- Host: Your Redshift cluster endpoint (from the AWS console)
- Port: Typically
5439(unless you use a custom port) - Database: Target database name
- Schema: Target schema name (defaults to
publicif not set) - Username / Password: The Redshift user credentials (for example, the
singularuser created above) - Region: The AWS region of your Redshift cluster (for example,
us-east-1)
S3 staging fields
Singular loads data via Redshift COPY from S3. You can either use a Singular-hosted S3 bucket (recommended) or provide your own.
- Use own S3 bucket:
- Off: Singular uses a Singular-hosted S3 bucket in the region you selected.
- On: You provide an S3 bucket and AWS credentials.
If Use own S3 bucket is On, configure:
- S3 bucket: The bucket name Redshift will read from
- Access key ID
- Secret access key
Note: Redshift
COPYrequires the S3 bucket region to be specified. Singular will include the S3 bucket region in theCOPYcommand.
Optional fields
- Table prefix: Prefix added to all destination table names
- Disable auto schema creation (
no_auto_schema_creation): If enabled, Singular will not attempt to create the destination schema automatically. - SSH tunnel (
use_ssh_tunnel): If enabled, configure:- SSH host
- SSH port
- SSH user
- SSH private key
After saving, confirm the destination shows as Connected.
Setup Guide (Source)
Use this section if you want to extract data from Redshift.
Step 1 - Ensure network access
Redshift must be reachable from Singular. Configure your Redshift security group inbound rules as described in Setup Guide (Destination) → Step 3 - Configure access.
Step 2 - Create / grant a read-only user
Create a dedicated user (recommended) and grant it access to the schemas/tables you want to extract.
At minimum, the user must be able to connect to the database and read from the selected tables/views.
Step 3 - Configure the source connector
Required fields
- Host: Your Redshift cluster endpoint
- Database: Database name
- Username / Password: Credentials for the Redshift user
- Datasets (
datasets): The list of datasets to extract (as configured in the UI)
Defaulted fields
If not provided, Singular uses the following defaults:
- Port (
port):5439 - TLS (
tls):true - SSH tunnel (
use_ssh_tunnel):false
If you enable SSH tunnel, provide the SSH host/port/user/private key in the connector configuration.
Streams
Destination behavior
Each stream is written to a table in the configured schema. Table names are derived from the stream name (optionally with the configured table prefix). Singular may add columns to existing tables as the schema evolves.
Source behavior
For Redshift sources, streams correspond to the datasets/tables you select in the Datasets configuration. Singular discovers available tables via the catalog and extracts using a Postgres-compatible protocol.
Setup Guide
Follow these steps to set up a Redshift destination.
-
Collect connection details
- Host and Port
- Database
- Username and Password
- Region (AWS region where your Redshift cluster runs)
- Optional: Schema (defaults to
public) - Optional: Table prefix (prepended to all destination tables)
-
Choose an S3 staging option (required) Redshift loads data via
COPYfrom S3, so an S3 bucket is always required for staging.- Use Singular-hosted S3 (default): you only provide the Redshift connection details and Region.
- Use your own S3 bucket: enable Use own S3 bucket and provide:
- S3 bucket
- Access key ID
- Secret access key
-
(Optional) Configure an SSH tunnel If your Redshift cluster is only reachable from a private network, enable Use SSH tunnel and provide:
- SSH host and SSH port
- SSH user
- SSH private key
-
Save and test Save the destination and run a test sync to confirm connectivity and that staging to S3 works.
Configuration
Provide the following configuration values when setting up the Redshift destination.
- Host: Your Redshift cluster endpoint.
- Port: The Redshift port (default:
5439). - Database: Target database name.
- Username / Password: Credentials for a user with permission to create and write to tables in the target schema.
- Schema: Target schema to write into (default:
public). - Table prefix (optional): Prefix added to all destination table names.
- Disable automatic schema creation: When enabled, Singular will not attempt to create the target schema automatically.
- Region: The AWS region where your Redshift cluster is hosted (for example,
us-east-1). This is also used to select the S3 staging bucket/region used during loads.
Region
- Region: AWS region where your Redshift cluster (and the staging S3 bucket used for loads) is located.
S3 staging (required for COPY)
Singular stages data in S3 and then loads it into Redshift using COPY.
- Use your own S3 bucket:
- Disabled (default): Singular uses a Singular-managed S3 bucket in the selected Region.
- Enabled: You provide the S3 bucket and AWS credentials below.
If Use your own S3 bucket is enabled, configure:
- S3 bucket: Name of the bucket used for staging files.
- Access key ID / Secret access key: AWS credentials with permission to write objects to the bucket and read them back for
COPY.
File format
Data is staged as JSON and loaded with Redshift COPY ... FORMAT AS JSON 'auto'. Staged files are GZIP-compressed, and the COPY command uses GZIP accordingly.
SSH tunnel (optional)
Enable Use SSH tunnel to connect to Redshift through an SSH bastion host, then provide:
- SSH host
- SSH port
- SSH user
- SSH private key
Notes
- Data is staged in S3 and loaded into Redshift using
COPY. Staged files are GZIP-compressed and loaded withCOPY ... GZIP. - Loads use
COPY ... TRUNCATECOLUMNS, so if an incoming value exceeds the target column width (for example, aVARCHARlimit), Redshift truncates the value instead of failing the load. - When the connector needs to change an existing column’s data type, it performs the migration by adding a temporary column, casting data into it, renaming columns, and then dropping the old column. This approach requires that the column being migrated is not part of a
PRIMARY KEY,UNIQUE, orFOREIGN KEYconstraint, and is not used as aDISTKEYorSORTKEY.
Troubleshooting
Redshift loads data via COPY from S3. As of this connector version, the COPY command is run with TRUNCATECOLUMNS, which means:
- If a JSON field value is longer than the target column’s maximum length, Redshift will truncate the value during
COPYinstead of failing the load. - You may see truncated text in Redshift for very long string values.
Notes:
- In Redshift,
VARCHAR(n)is measured in bytes, not characters. UTF‑8 characters can take up to 4 bytes each, so strings with non‑ASCII characters can hit limits sooner than expected. - The maximum size for a Redshift
VARCHARvalue is 65,535 bytes. Values longer than this cannot be stored fully and will be truncated whenTRUNCATECOLUMNSis in effect.
If you need to preserve full text values, consider transforming/truncating upstream to a known safe length, or storing large payloads outside Redshift and loading only references/keys.
When the connector needs to change an existing column’s type, it may do so by adding a temporary column, backfilling it via CAST, and then renaming columns. Redshift restricts some ALTER TABLE operations for columns that participate in table design or constraints. Type changes may fail if the column is any of the following:
- Part of a PRIMARY KEY, UNIQUE, or FOREIGN KEY constraint
- A DISTKEY or SORTKEY column
If you hit an error during a sync that mentions ALTER TABLE, RENAME COLUMN, DROP COLUMN, or constraints/keys, check whether the affected column is protected by one of the items above. To proceed, you typically need to:
- Choose a different column for keys/distribution/sort (if applicable), or
- Apply the type change manually in Redshift (for example by creating a new column and migrating data), or
- Recreate the table with the desired schema and re-sync data into it