Snowflake
Destination Documentation: Snowflake Documentation
High-Level Information:
Snowflake is a cloud-based data warehouse platform that enables organizations to store, analyze, and share data at scale. Extract integrates with Snowflake using key pair authentication and loads data through S3-based staging. The connector supports multiple load modes including incremental upserts, full refreshes, and temporal history tracking. Data is staged as JSON in S3, then loaded into Snowflake tables using the COPY INTO command for optimal performance. The integration supports all Snowflake editions and can be configured with custom S3 buckets for organizations requiring data residency control.
Prerequisites
- A Snowflake account with
ACCOUNTADMINrole. - Ability to run SQL queries in your Snowflake instance.
Setup Guide
Step 1 - Open your favorite SQL editor, or use Snowflake's UI
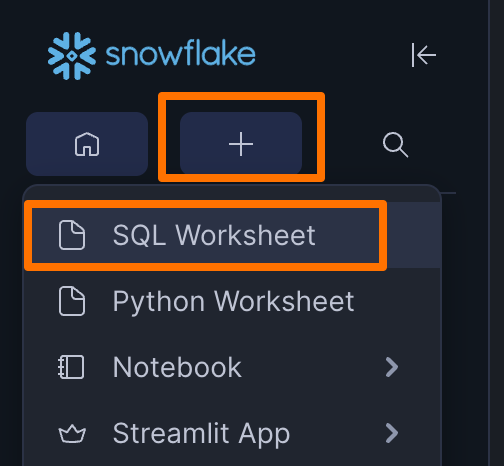
If you're using Snowflake's UI, you can open an SQL worksheet in the following way:
Step 2 - Generate a private and public key pair
In a terminal (Mac, Linux or Windows), with OpenSSL installed, generate a PKCS#8 private key and matching public key with these commands. Extract accepts both PKCS#8 and PKCS#1 PEM private keys, but Snowflake recommends PKCS#8 and that is the preferred format for new setups:
openssl genrsa 2048 | openssl pkcs8 -topk8 -v2 des3 -inform PEM -out extract_snowflake.p8
openssl rsa -in extract_snowflake.p8 -pubout -out extract_snowflake.pub
The private key will be uploaded to Extract, and the public key will be sent to Snowflake. If you already have a PKCS#1 PEM key, such as a file beginning with -----BEGIN RSA PRIVATE KEY-----, Extract will still accept it. PKCS#8 keys usually begin with -----BEGIN PRIVATE KEY----- or -----BEGIN ENCRYPTED PRIVATE KEY-----.
Step 3 - Create a Snowflake role and "service user" for Extract to access
USE ROLE ACCOUNTADMIN;

-- Create the role
CREATE ROLE extract_role;

-- Create the user
CREATE USER extract_user
   TYPE = SERVICE
   DEFAULT_ROLE = extract_role
   RSA_PUBLIC_KEY = '<INSERT CONTENTS OF extract_snowflake.pub FROM STEP 2>';

-- Grant the user access to the role
GRANT ROLE extract_role TO USER extract_user;
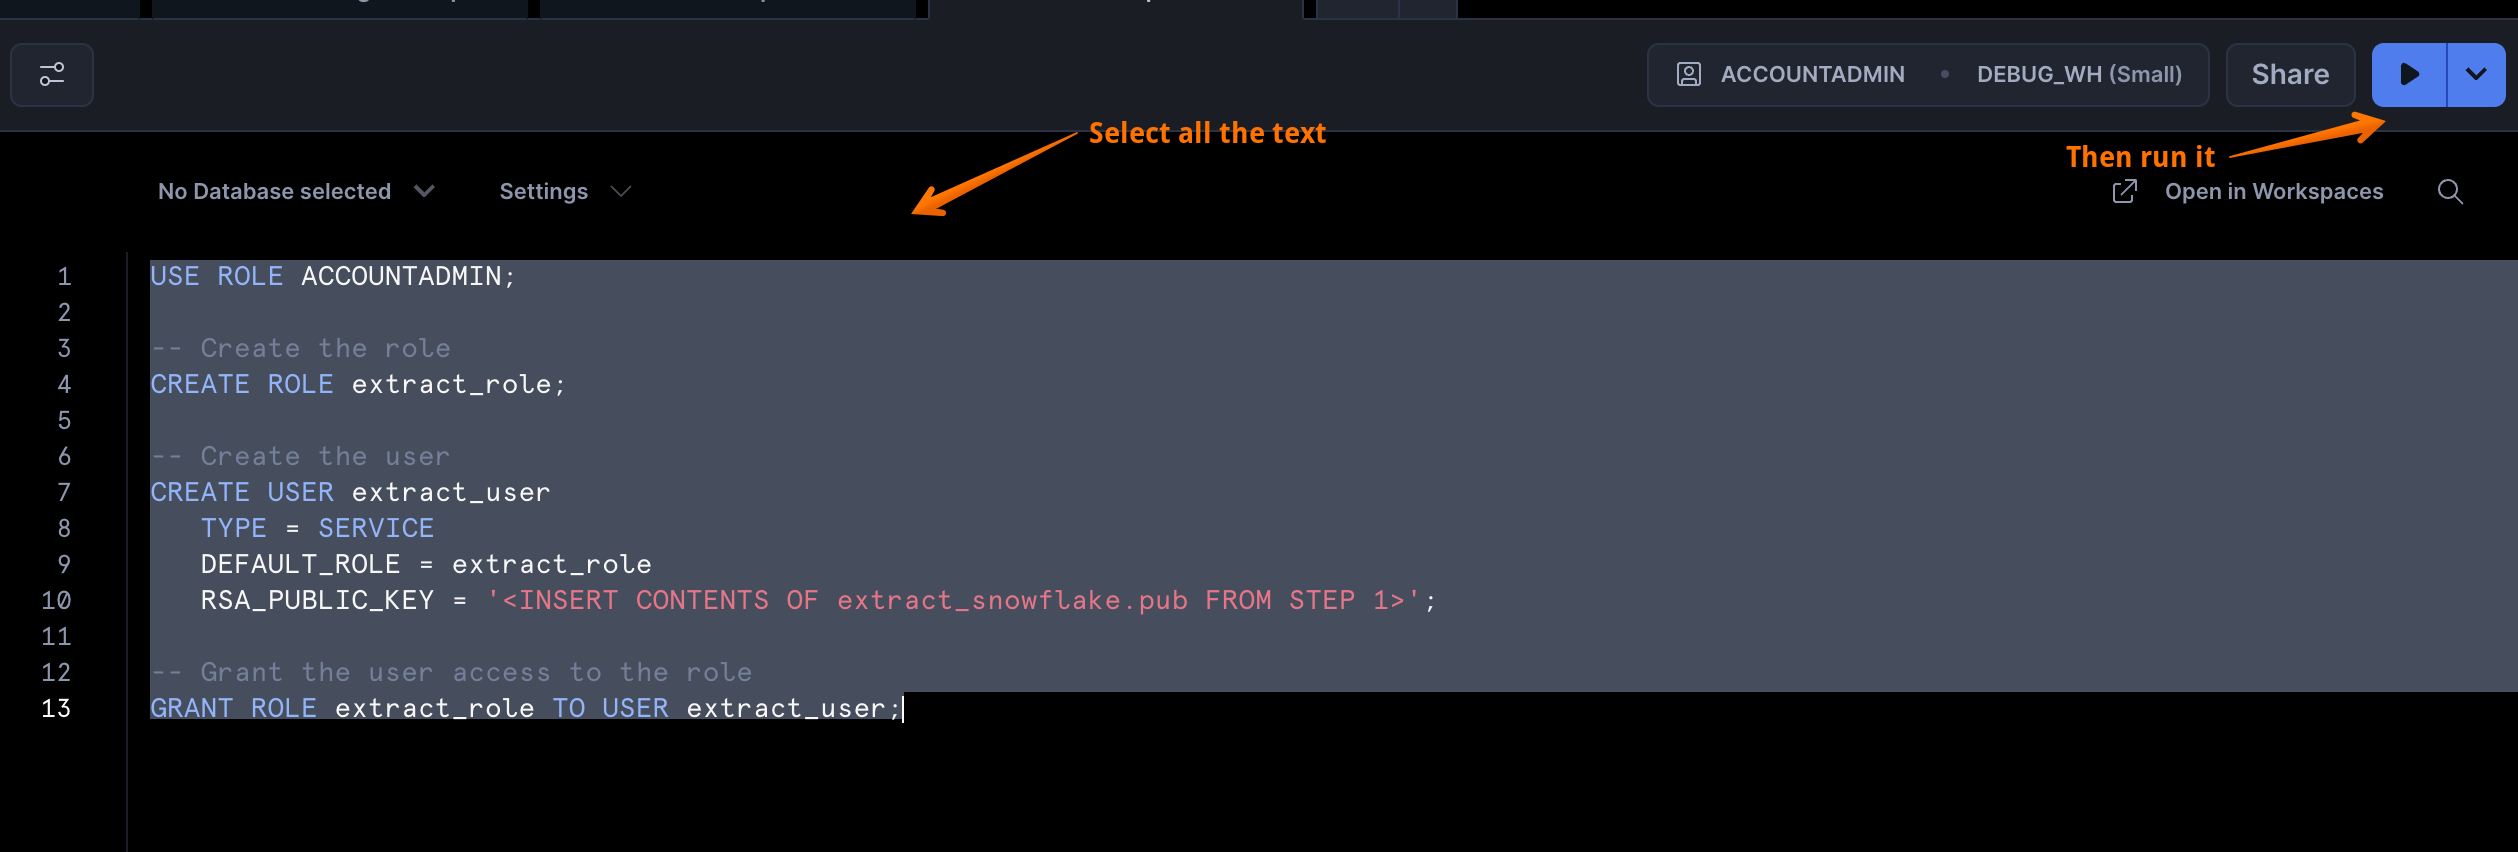
When running commands in Snowflake's UI - you must visually select the rows you want to run. So when copy-pasting the SQL commands below, make sure you select all the rows in the UI and then run them.
Step 4 - Create a database, or grant access to an existing database
You can either create a separate database for the Extract integration:
CREATE DATABASE IF NOT EXISTS extract;
GRANT ALL ON DATABASE extract TO ROLE extract_role;
Or utilize an existing database and grant access to Extract:
GRANT ALL ON DATABASE <existing_database_name> TO ROLE extract_role;
Step 5 - Create a warehouse, or grant access to an existing warehouse
A Snowflake warehouse is a compute resource that provides the processing power needed to execute SQL queries and perform data operations, with the ability to scale up or down based on workload demands.
You can either create a separate warehouse for the Extract integration:
CREATE WAREHOUSE IF NOT EXISTS extract_warehouse
   WAREHOUSE_TYPE = STANDARD
   WAREHOUSE_SIZE = XSMALL
   AUTO_SUSPEND = 60
   AUTO_RESUME = TRUE
   INITIALLY_SUSPENDED = TRUE;
GRANT ALL ON WAREHOUSE extract_warehouse TO ROLE extract_role;
Or utilize an existing warehouse and grant access to Extract:
GRANT ALL ON WAREHOUSE <warehouse_name> TO ROLE extract_role;
Step 6 (Optional) - configure your own staging S3 bucket
When loading data to Snowflake, we upload files to a cloud storage service, and create a Snowflake STAGE that references that file.
If you'd like to use your own S3 bucket for staging data (some companies prefer to have all the data persist on their own cloud), you can create an S3 bucket, and make sure you get the following:
- S3 bucket name
- IAM User Access Key Id - created in your own AWS account, this grants read/write access to the S3 bucket
- IAM User Secret Access Key - created in your own AWS account, this grants read/write access to the S3 bucket
Step 7 (Optional) - Whitelist Extract's Server IPs
If you have a network policy set up in your Snowflake instance, you need to whitelist Extract's Server IPs:
3.134.124.160/323.150.64.207/3244.232.26.19/3254.214.149.234/32
Step 8 - Configure the connector in Extract
-
Account Identifier - The part before ".snowflakecomputing.com" in your Snowflake URL. Example: if your URL is
https://xy12345.us-east-1.snowflakecomputing.com, usexy12345.us-east-1. -
Username -
extract_useror whatever name you used in Step 3. -
Private Key - The contents of the private key file from Step 2, including the BEGIN and END markers. PKCS#8 is preferred, but PKCS#1 PEM keys are also accepted.
-
Private Key Passphrase - Enter the passphrase you used when creating the private key in Step 2. Leave this empty only if your private key is unencrypted.
-
Warehouse -
extract_warehouseor whatever name you used in Step 5. -
Database -
extractor whatever name you used in Step 4. -
Use your own S3 bucket - Optional, if you performed Step 6.
Hit "Save" and check the logs/status to confirm the connection is successful.
Configuration Parameters
Once you've configured the Snowflake destination, you can set the following parameters for your connections:
- Account Identifier - Your Snowflake account identifier (e.g.,
xy12345.us-east-1). This is the hostname prefix before.snowflakecomputing.com. - Username - The Snowflake service user created for Extract (e.g.,
extract_user). - Private Key - The private key in PEM format used for authentication. PKCS#8 is preferred, but PKCS#1 PEM keys are also accepted.
- Warehouse - The Snowflake warehouse to use for compute resources during data loading.
- Database - The target database where Extract will create and load tables.
Optional Parameters
- Private Key Passphrase - Passphrase for the encrypted private key, if applicable.
- Schema - The schema name within the database. If not specified, Snowflake will use the user's default schema. Note: Snowflake converts schema names to uppercase internally.
- Table Prefix - A prefix to prepend to all table names created by Extract. Example: setting this to
staging_will create tables likestaging_customers,staging_orders, etc. - Role - A specific Snowflake role to use for executing queries. If provided, this role must have appropriate permissions on the database and warehouse.
- Proxy URL - Optional proxy URL to route Snowflake connectivity through (for example,
http://proxy.example.com:8080).
S3 Staging Configuration
- Use your own S3 bucket - Whether to use your own AWS S3 bucket for staging data. If set to
false, Extract uses its managed S3 buckets. - S3 Bucket - (Required if using your own S3 bucket) Your AWS S3 bucket name for staging files during data loads.
- Access Key ID - (Required if using your own S3 bucket) AWS IAM Access Key ID with read/write permissions to your S3 bucket.
- Secret Access Key - (Required if using your own S3 bucket) AWS IAM Secret Access Key corresponding to the access key ID.
Connection Settings
When creating a connection from a source to Snowflake, you'll also configure:
- Connection Pull Schedule - Determines how frequently data is extracted from the source and loaded into Snowflake.
- Backfill (Days) - Specifies the duration for which historical data will be retrieved during each connection run.
- Target Schema - The Snowflake schema where tables will be created (can be set at connection level or use the destination default). If provided, the schema name is uppercased.
- Schema Migration Policy - Controls how Extract handles schema changes from the source (e.g., new columns, changed data types).
Data Contract Information
This destination supports data contracts. When enabled, the connector can generate and maintain a contract-like catalog for your Snowflake objects (for example, table and column metadata) and use it to keep downstream expectations stable over time.
A generated contract may include:
- Schemas and tables discovered in the configured database
- Column names and types
- Primary/foreign key hints (when available)
- Table-level metadata such as row-count/size estimates and comments (when available)
Incremental regeneration behavior
When regenerating contracts, the connector can reuse previously generated table specs when the underlying table schema has not changed, and regenerate only the tables that changed. Tables that no longer exist may be removed from the generated catalog.
This helps keep contracts stable and reduces unnecessary churn in generated artifacts.
Additional Information
Extract loads data into Snowflake using the following process:
- Extract - Data is extracted from your source connector
- Stage to S3 - Records are written as JSONL (newline-delimited JSON) files to S3 (either Extract's managed buckets or your own)
- Create Temp Table - A temporary staging table is created in Snowflake with the same schema as the target table
- Create Stage - A Snowflake STAGE object is created pointing to the S3 location with appropriate credentials
- Load Data - The
COPY INTOcommand loads JSON data from S3 into the temporary table - Apply Load Mode - Data is moved from the temp table to the final table using the configured load mode (Append, Replace, Upsert, etc.)
- Cleanup - Temporary resources (stage, temp table) are removed
This approach ensures efficient bulk loading while maintaining data consistency and supporting various update patterns.
Best Practices
- Warehouse Sizing - Start with an XSMALL warehouse for most workloads. Snowflake's auto-resume and auto-suspend features ensure you only pay for compute when actively loading data.
- Separate Warehouse - Create a dedicated warehouse for Extract to isolate costs and prevent interference with other workloads.
- Schema Organization - Consider using a dedicated schema (e.g.,
EXTRACT) or table prefix to separate Extract-loaded tables from other data. - Network Security - If you have network policies enabled, remember to whitelist all Extract IP addresses:
3.134.124.160/32,3.150.64.207/32,44.232.26.19/32,54.214.149.234/32. - Monitoring - Use Snowflake's query history and warehouse usage views to monitor Extract's load performance and optimize warehouse sizing if needed.
Metadata exports and Extract Insights
If you use Extract Insights features that generate documentation or recommendations from your Snowflake catalog, Extract may reuse previously generated table context when available. This helps keep outputs stable across runs and reduces unnecessary regeneration when the underlying schema hasn’t changed.