Amazon S3
Prerequisites
- Admin access to your AWS Console to create/configure an S3 bucket and permissions
Setup Guide
Step 1 - Create an S3 bucket (skip if you already have one you want to use)
-
Login to your AWS Console and switch to the desired region. We recommend choosing the same region you have the rest of your compute/storage/databases (Redshift, Postgres, EC2, EKS, etc).
-
Go to the S3 home page, and click "Create bucket":
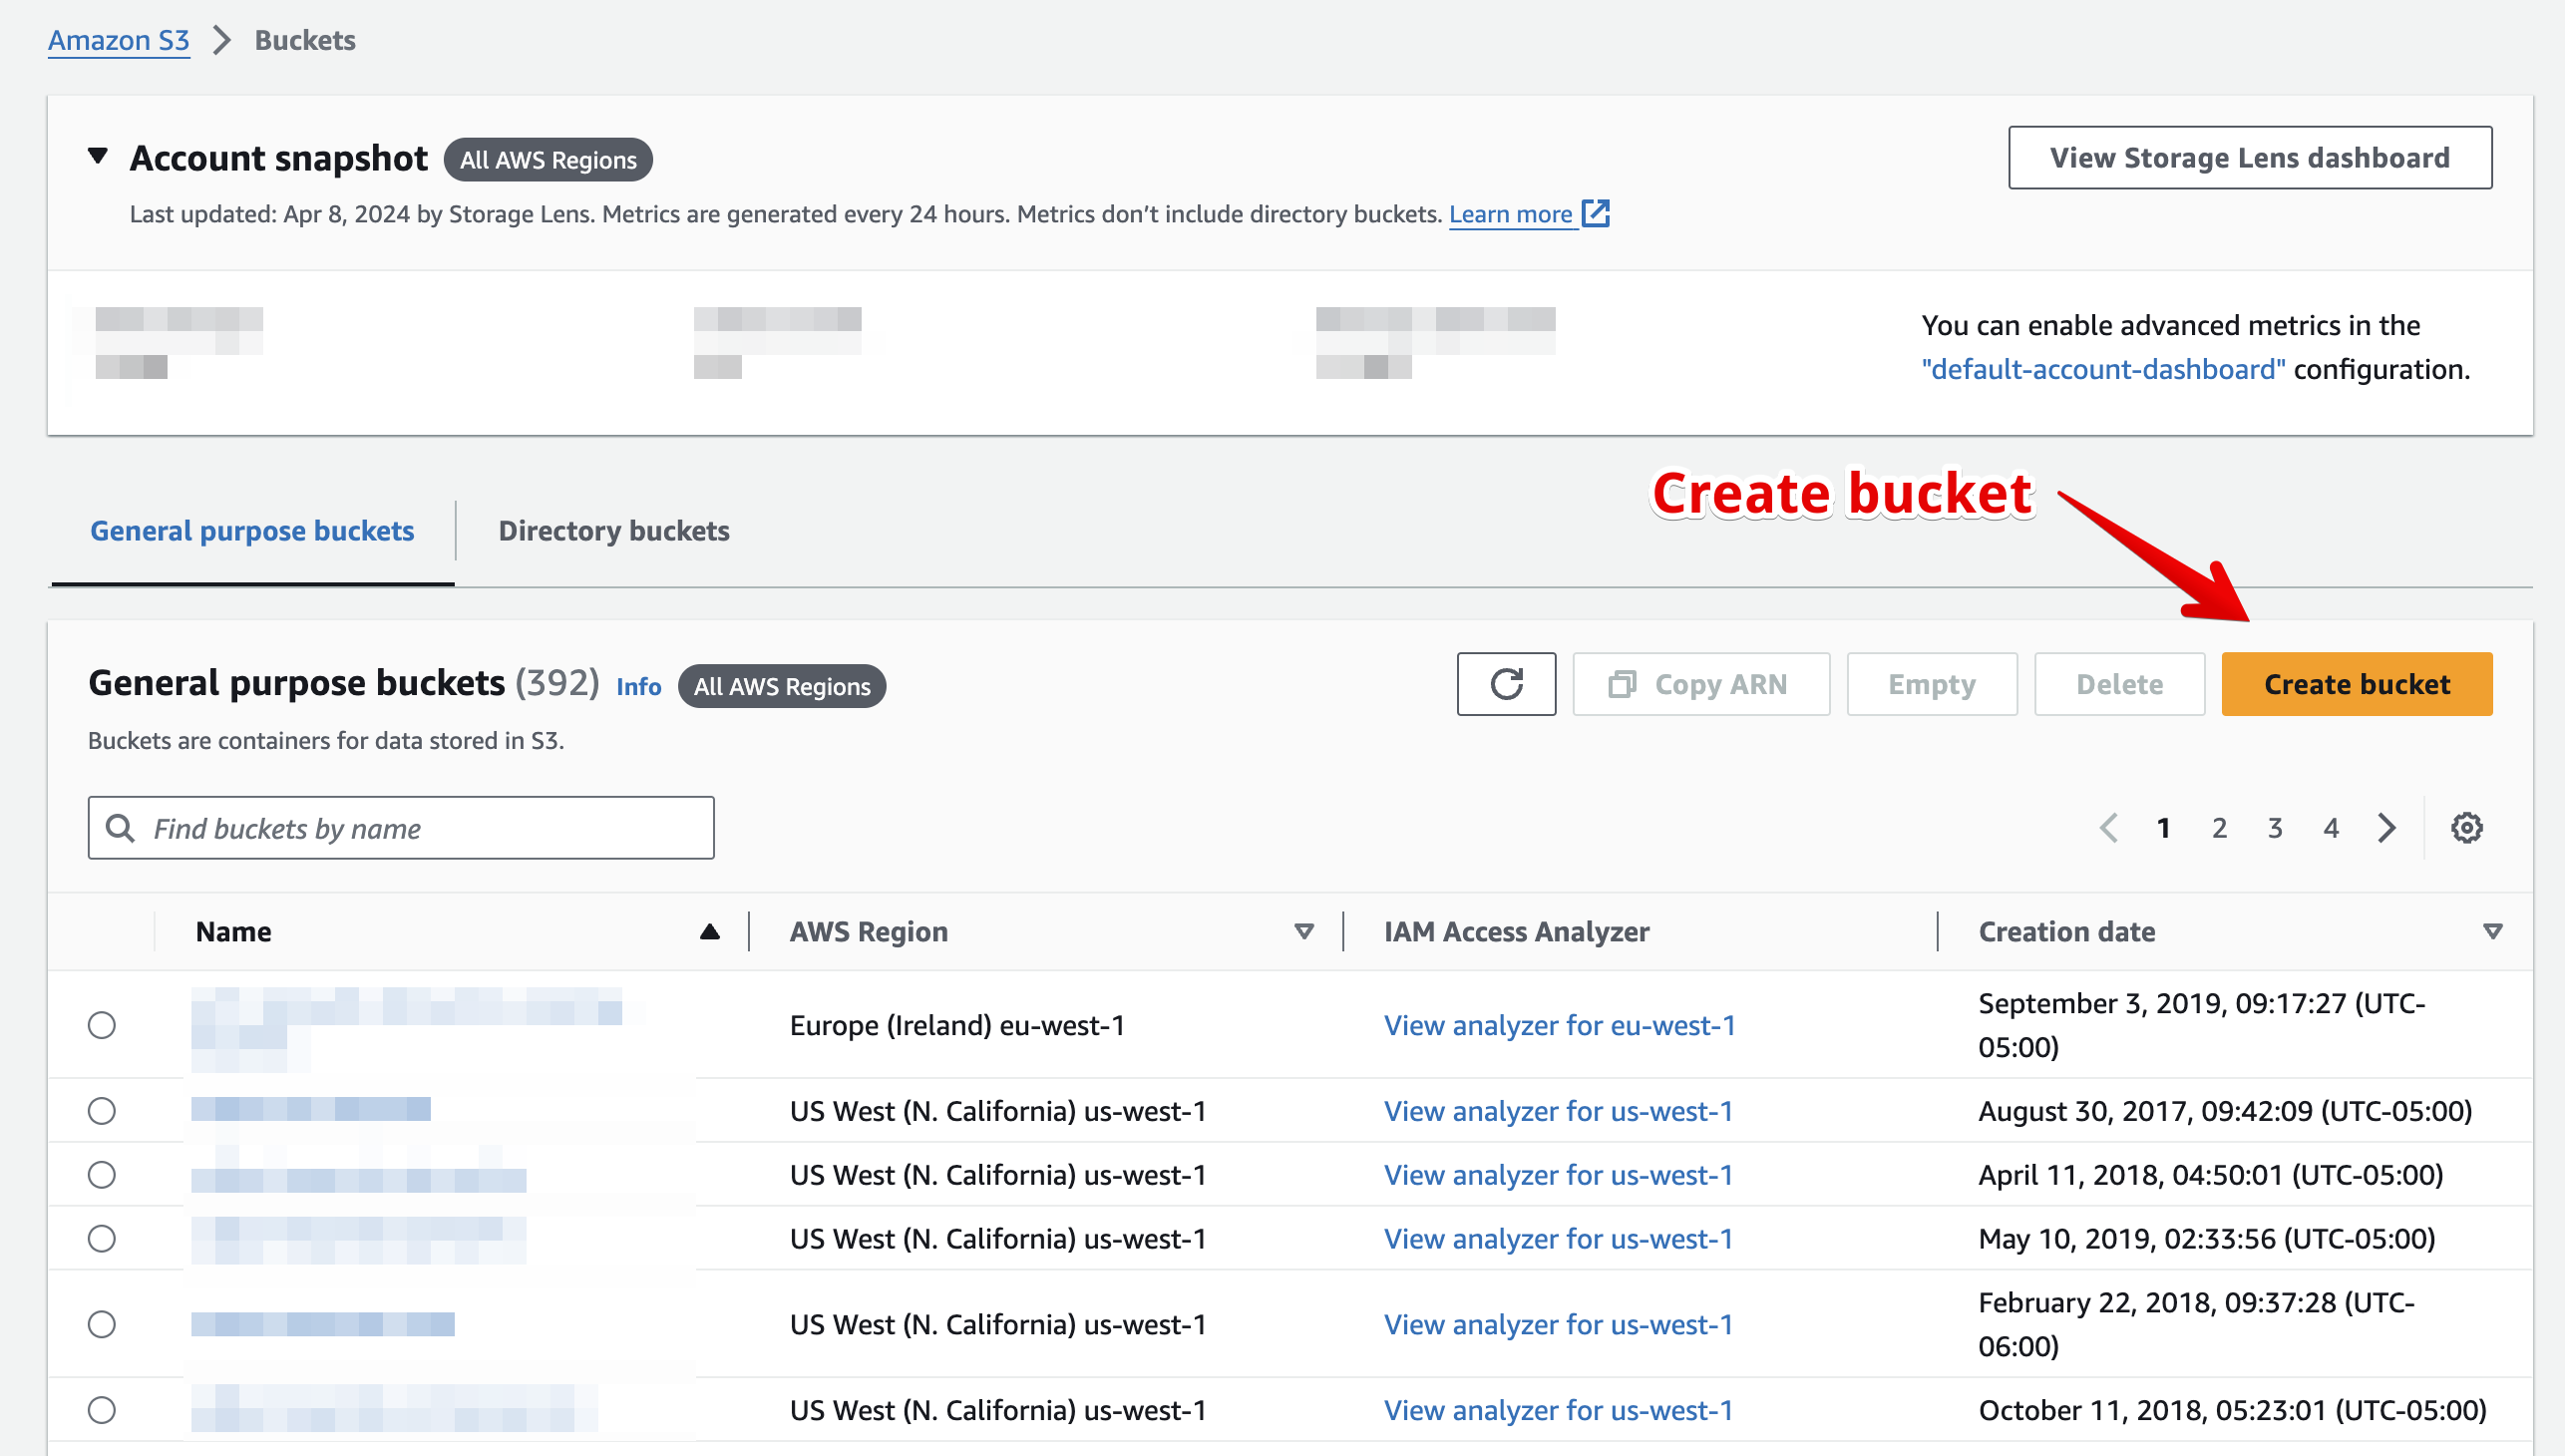
-
Select a name for your bucket and keep ACLs disabled
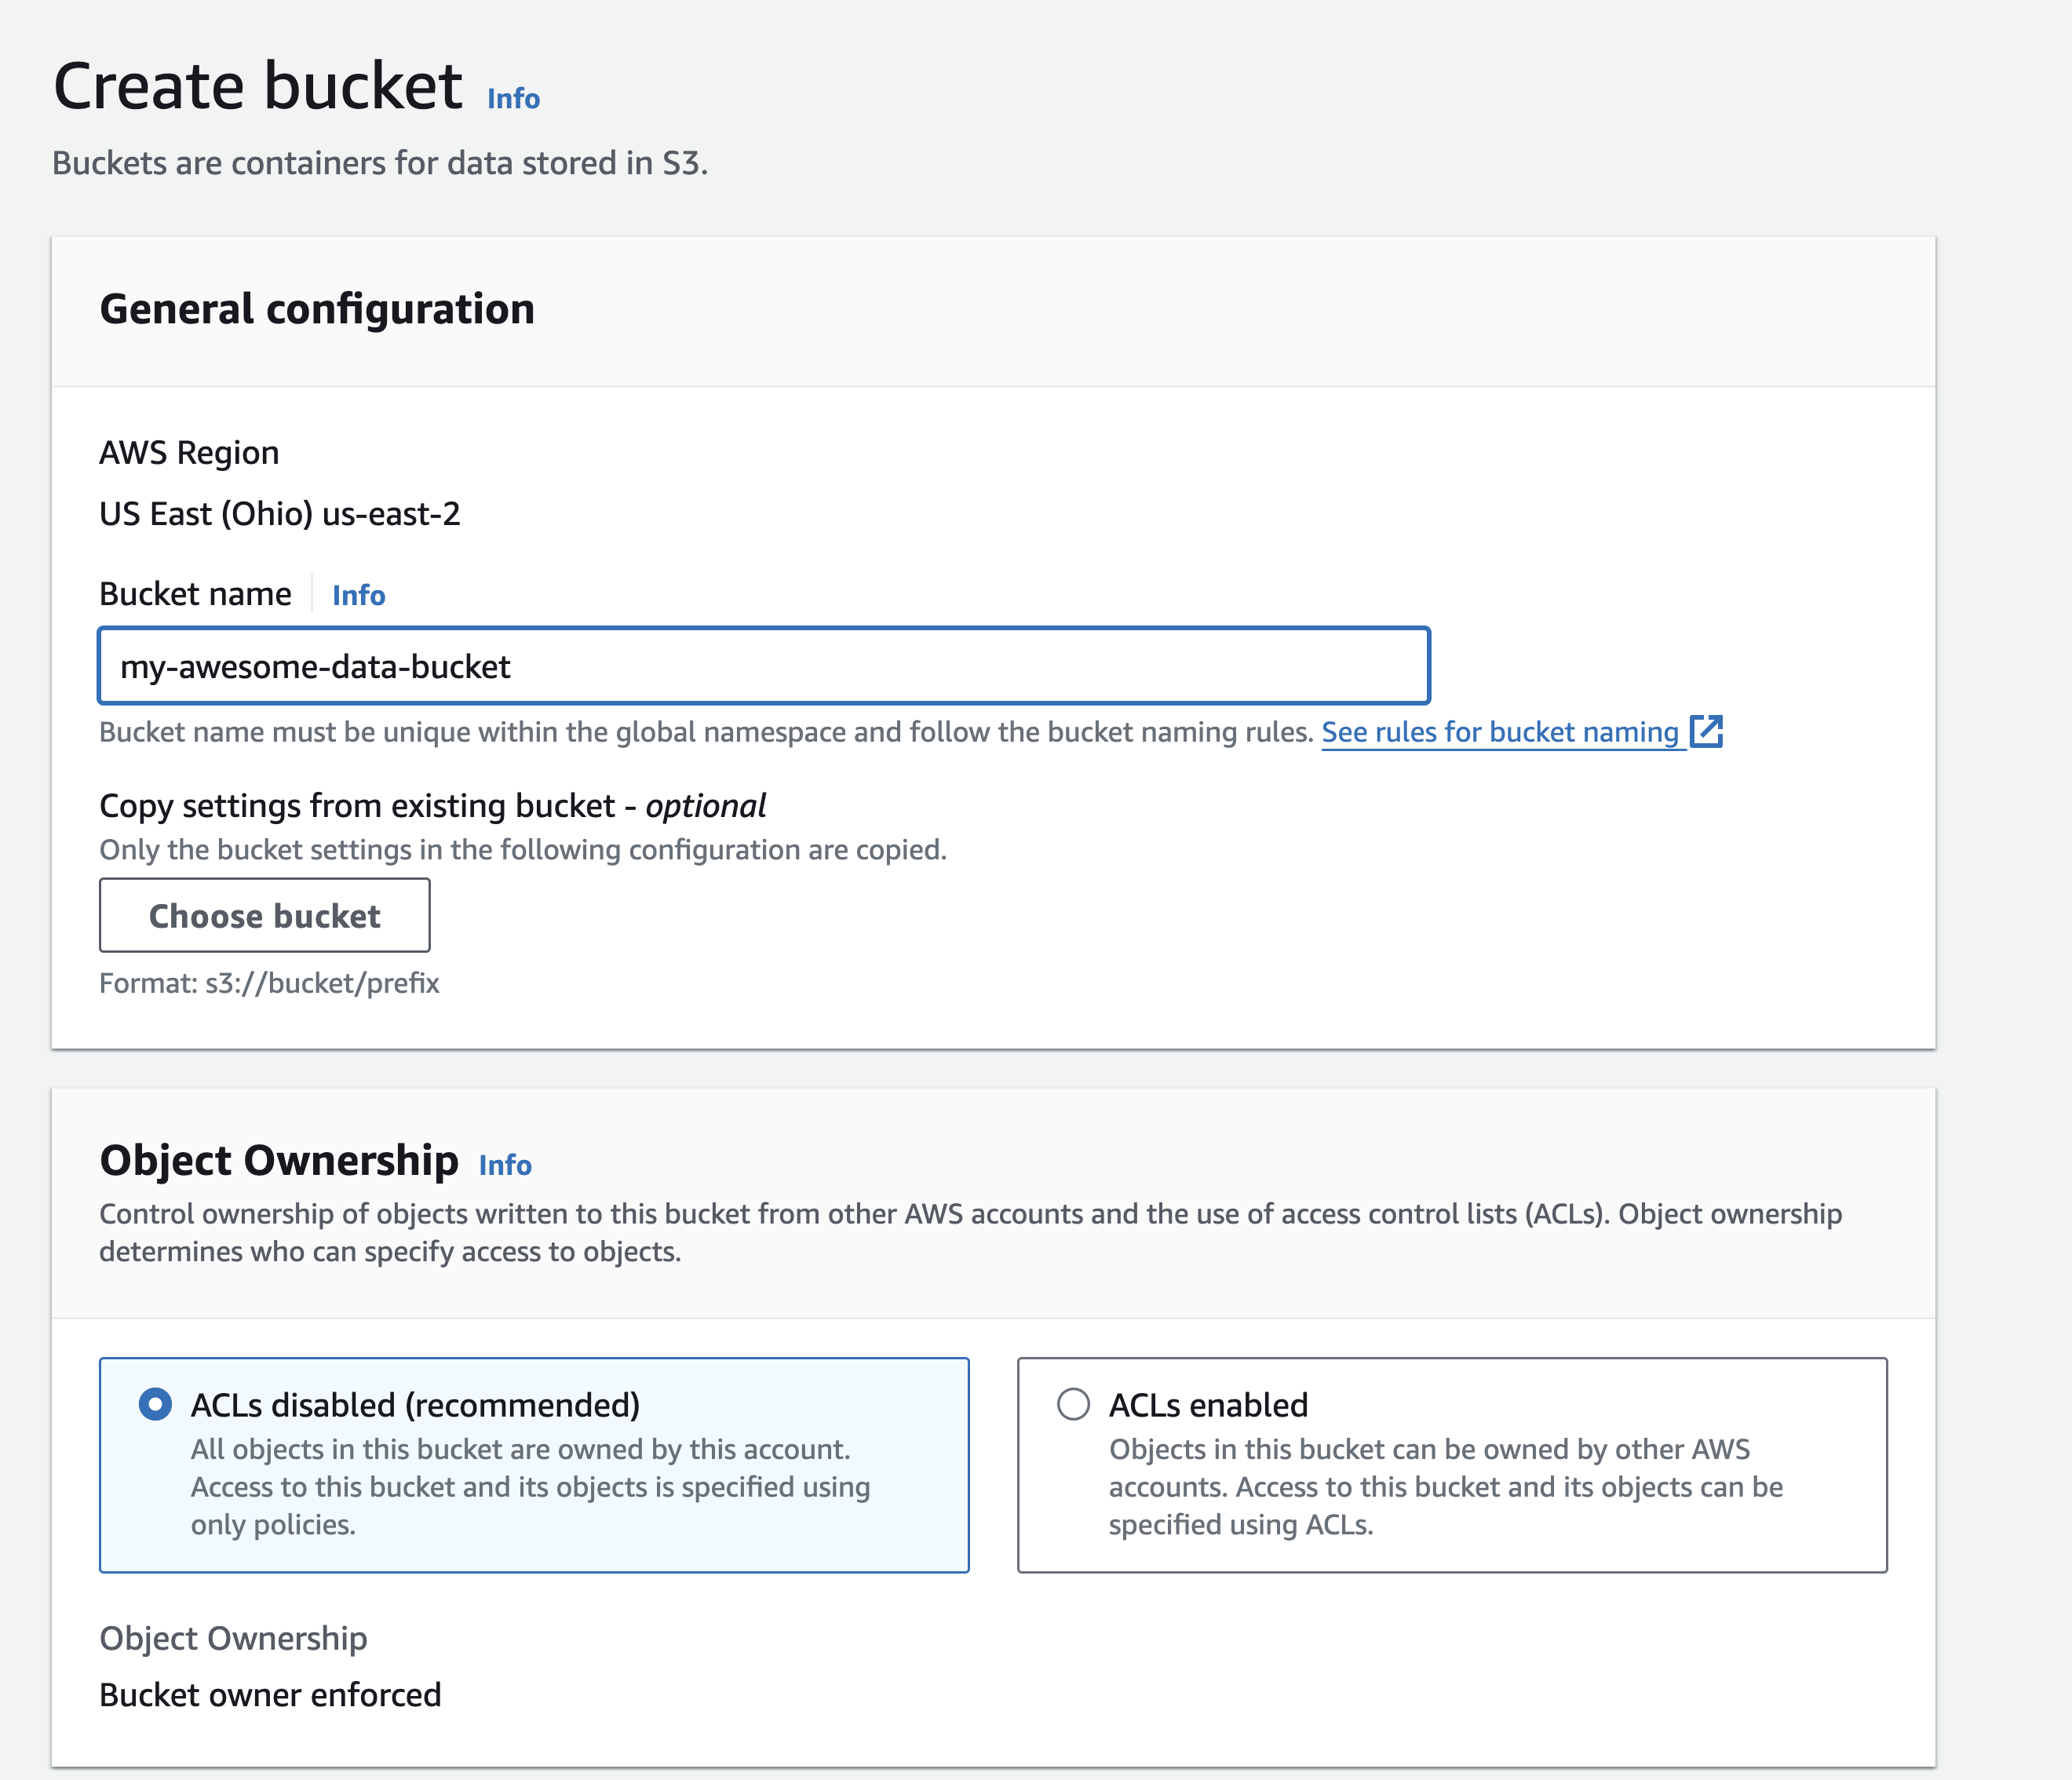
-
You can use the default values for the rest of the settings, or change them to your liking.
Step 2 - Create a policy that grants access to the bucket
-
In your AWS Console, go to IAM. In the menu on the left, click Policies.
-
Click Create Policy and click the JSON tab.
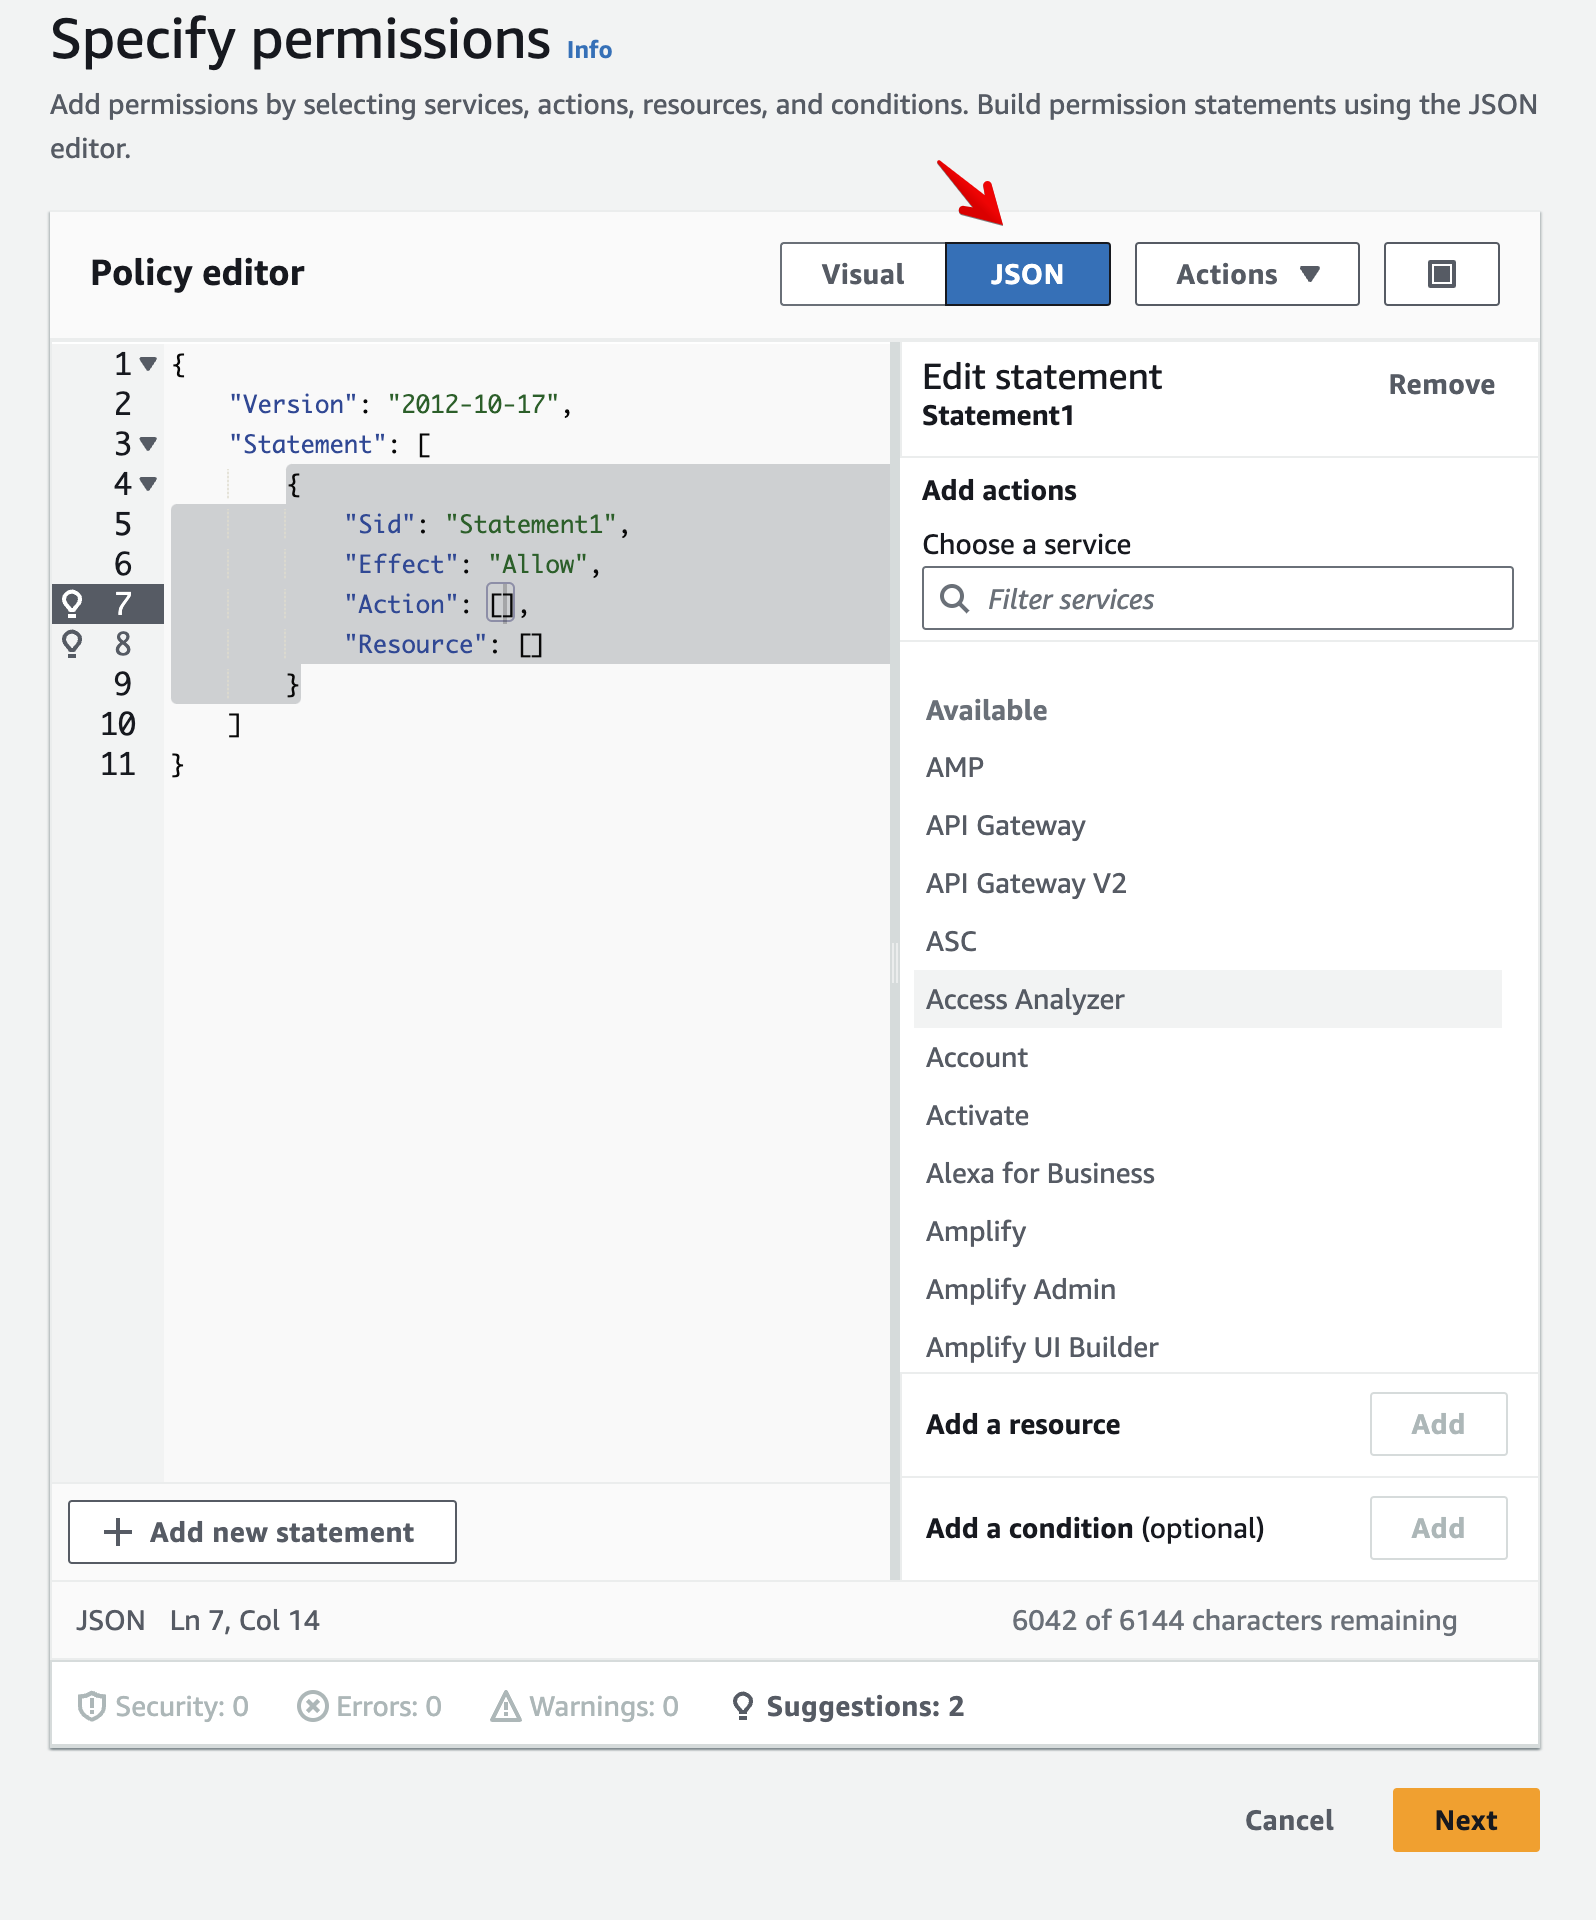
-
Copy the following policy (replace YOUR_S3_BUCKET_NAME with the real bucket name):
{
    "Version": "2012-10-17",
    "Id": "",
    "Statement": [
        {
            "Sid": "ExtractBucketAccess",
            "Effect": "Allow",
            "Action":
            [
                "s3:GetObject",
                "s3:PutObject",
                "s3:ListBucket",
                "s3:GetBucketLocation",
                "s3:DeleteObject"
            ],
            "Resource":
            [
                "arn:aws:s3:::YOUR_S3_BUCKET_NAME",
                "arn:aws:s3:::YOUR_S3_BUCKET_NAME/*"
            ]
        }
    ]
}
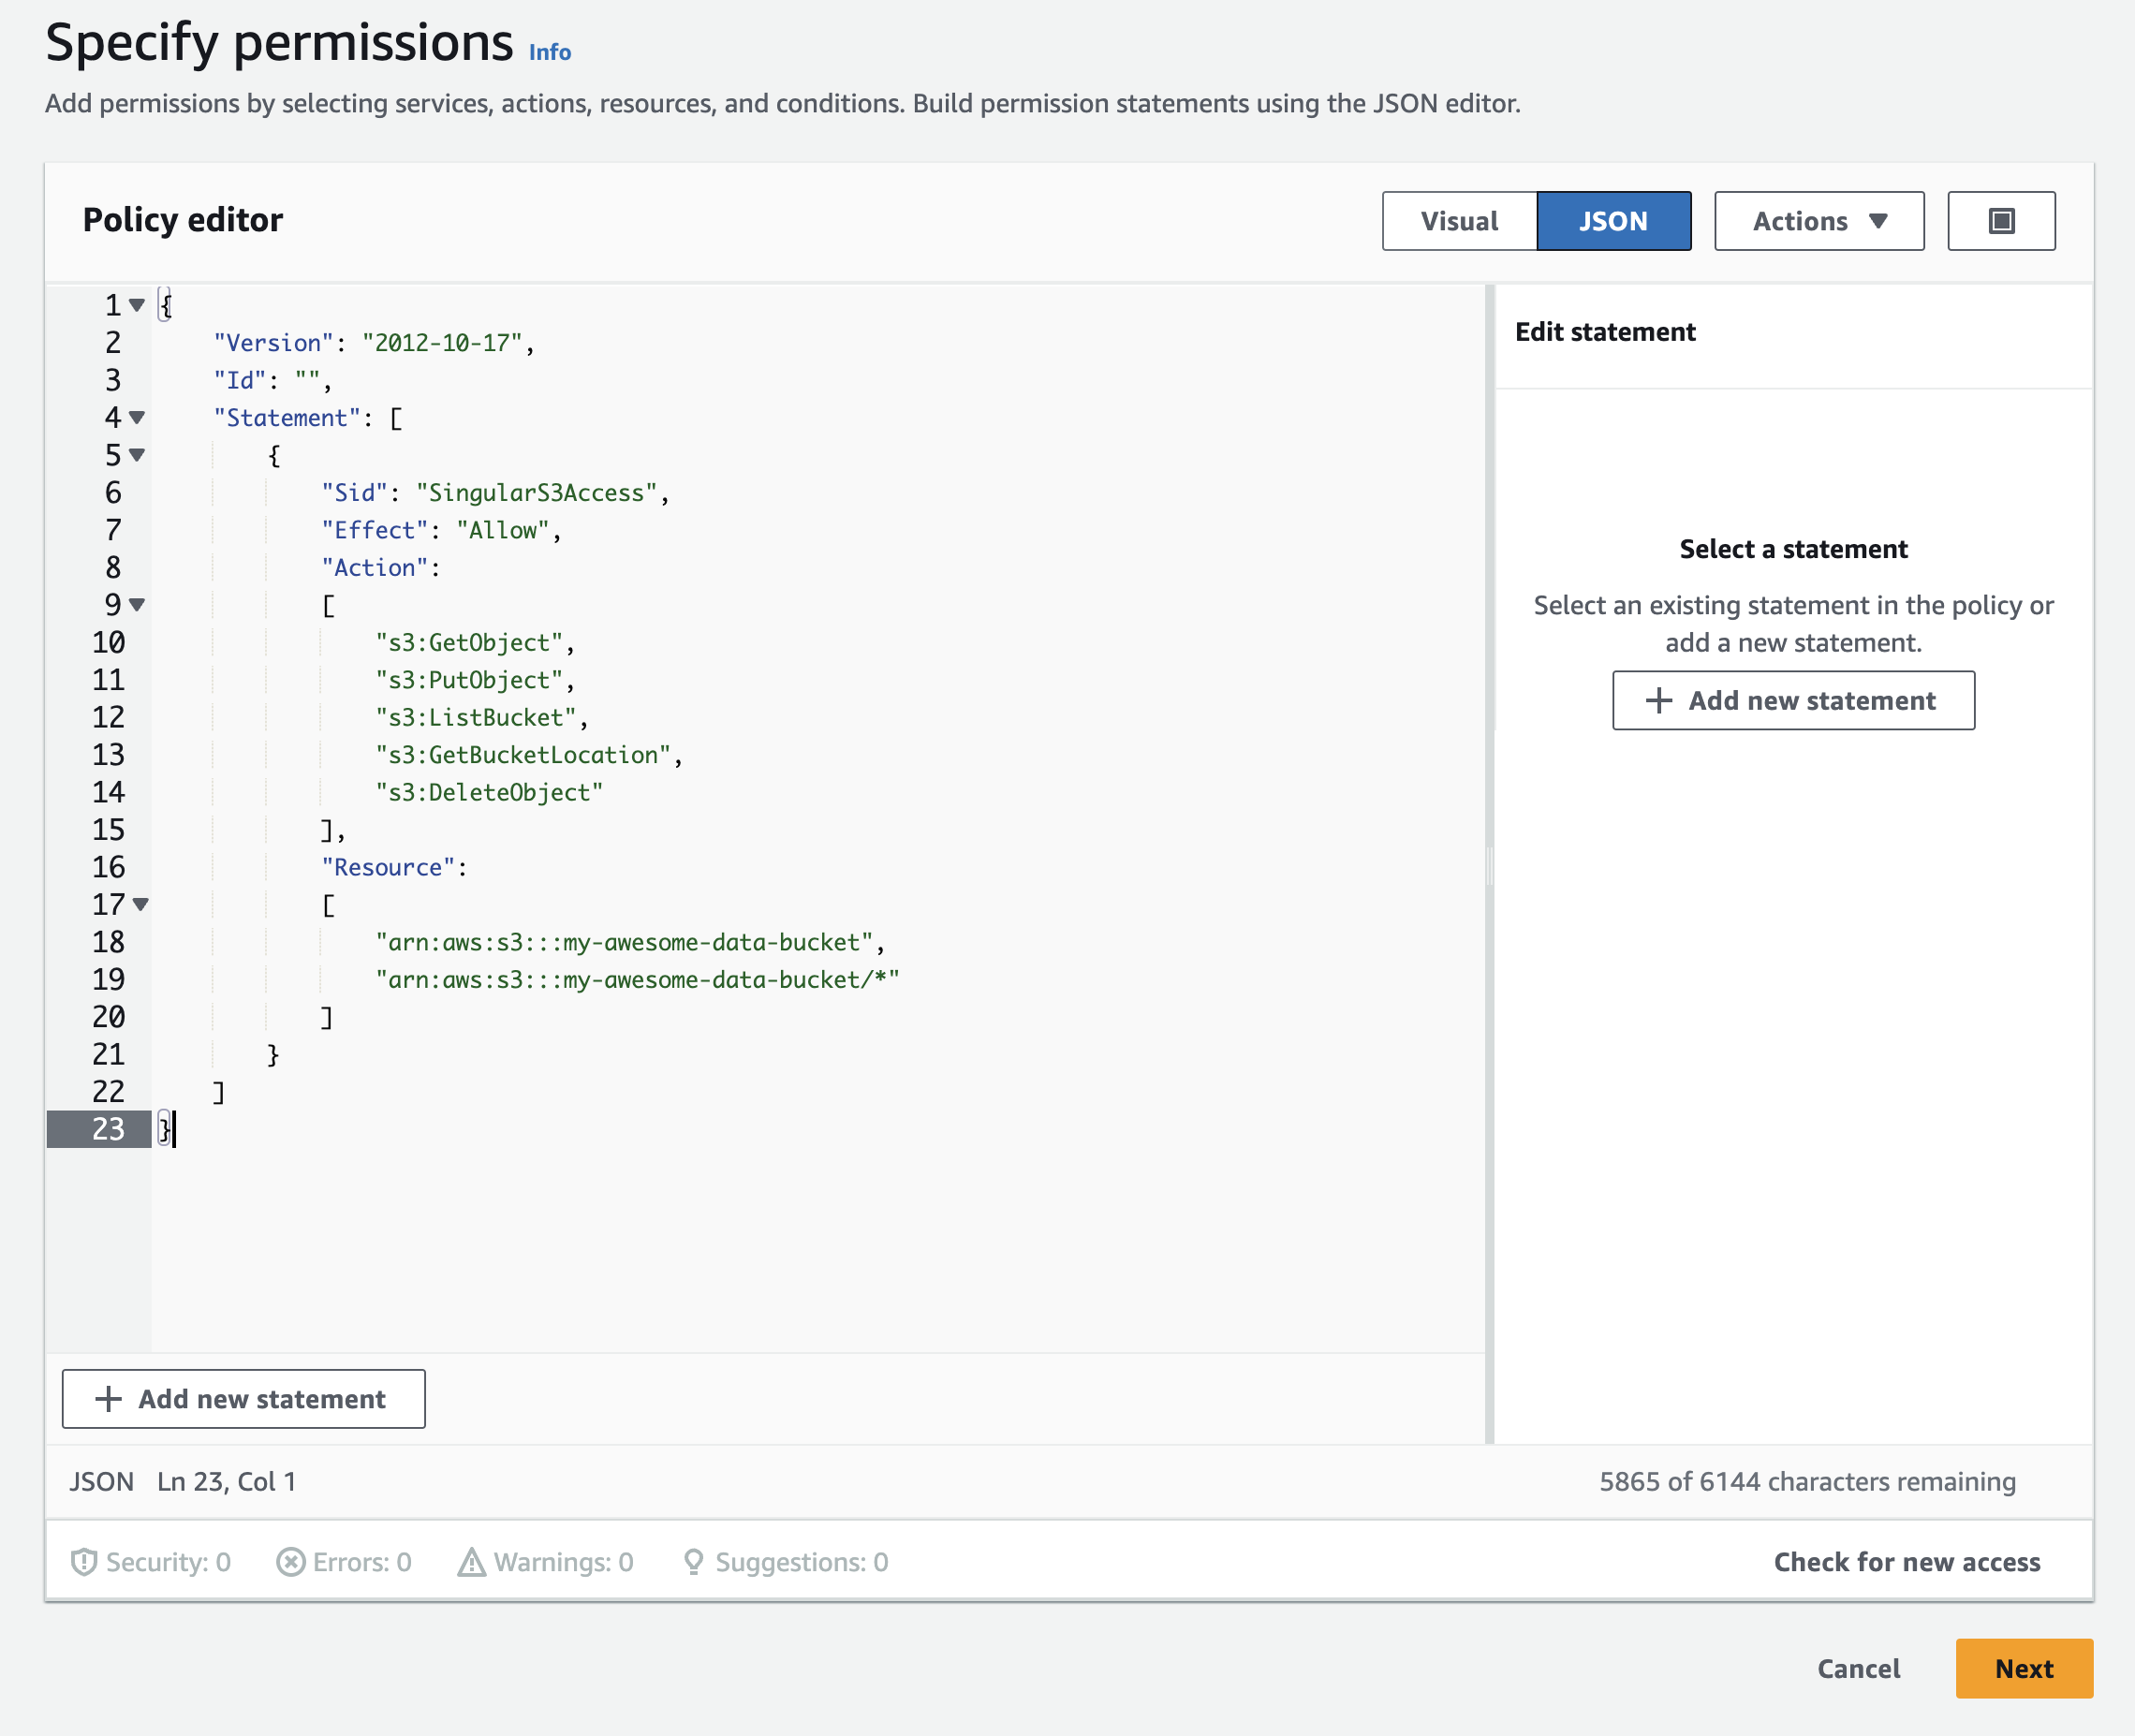
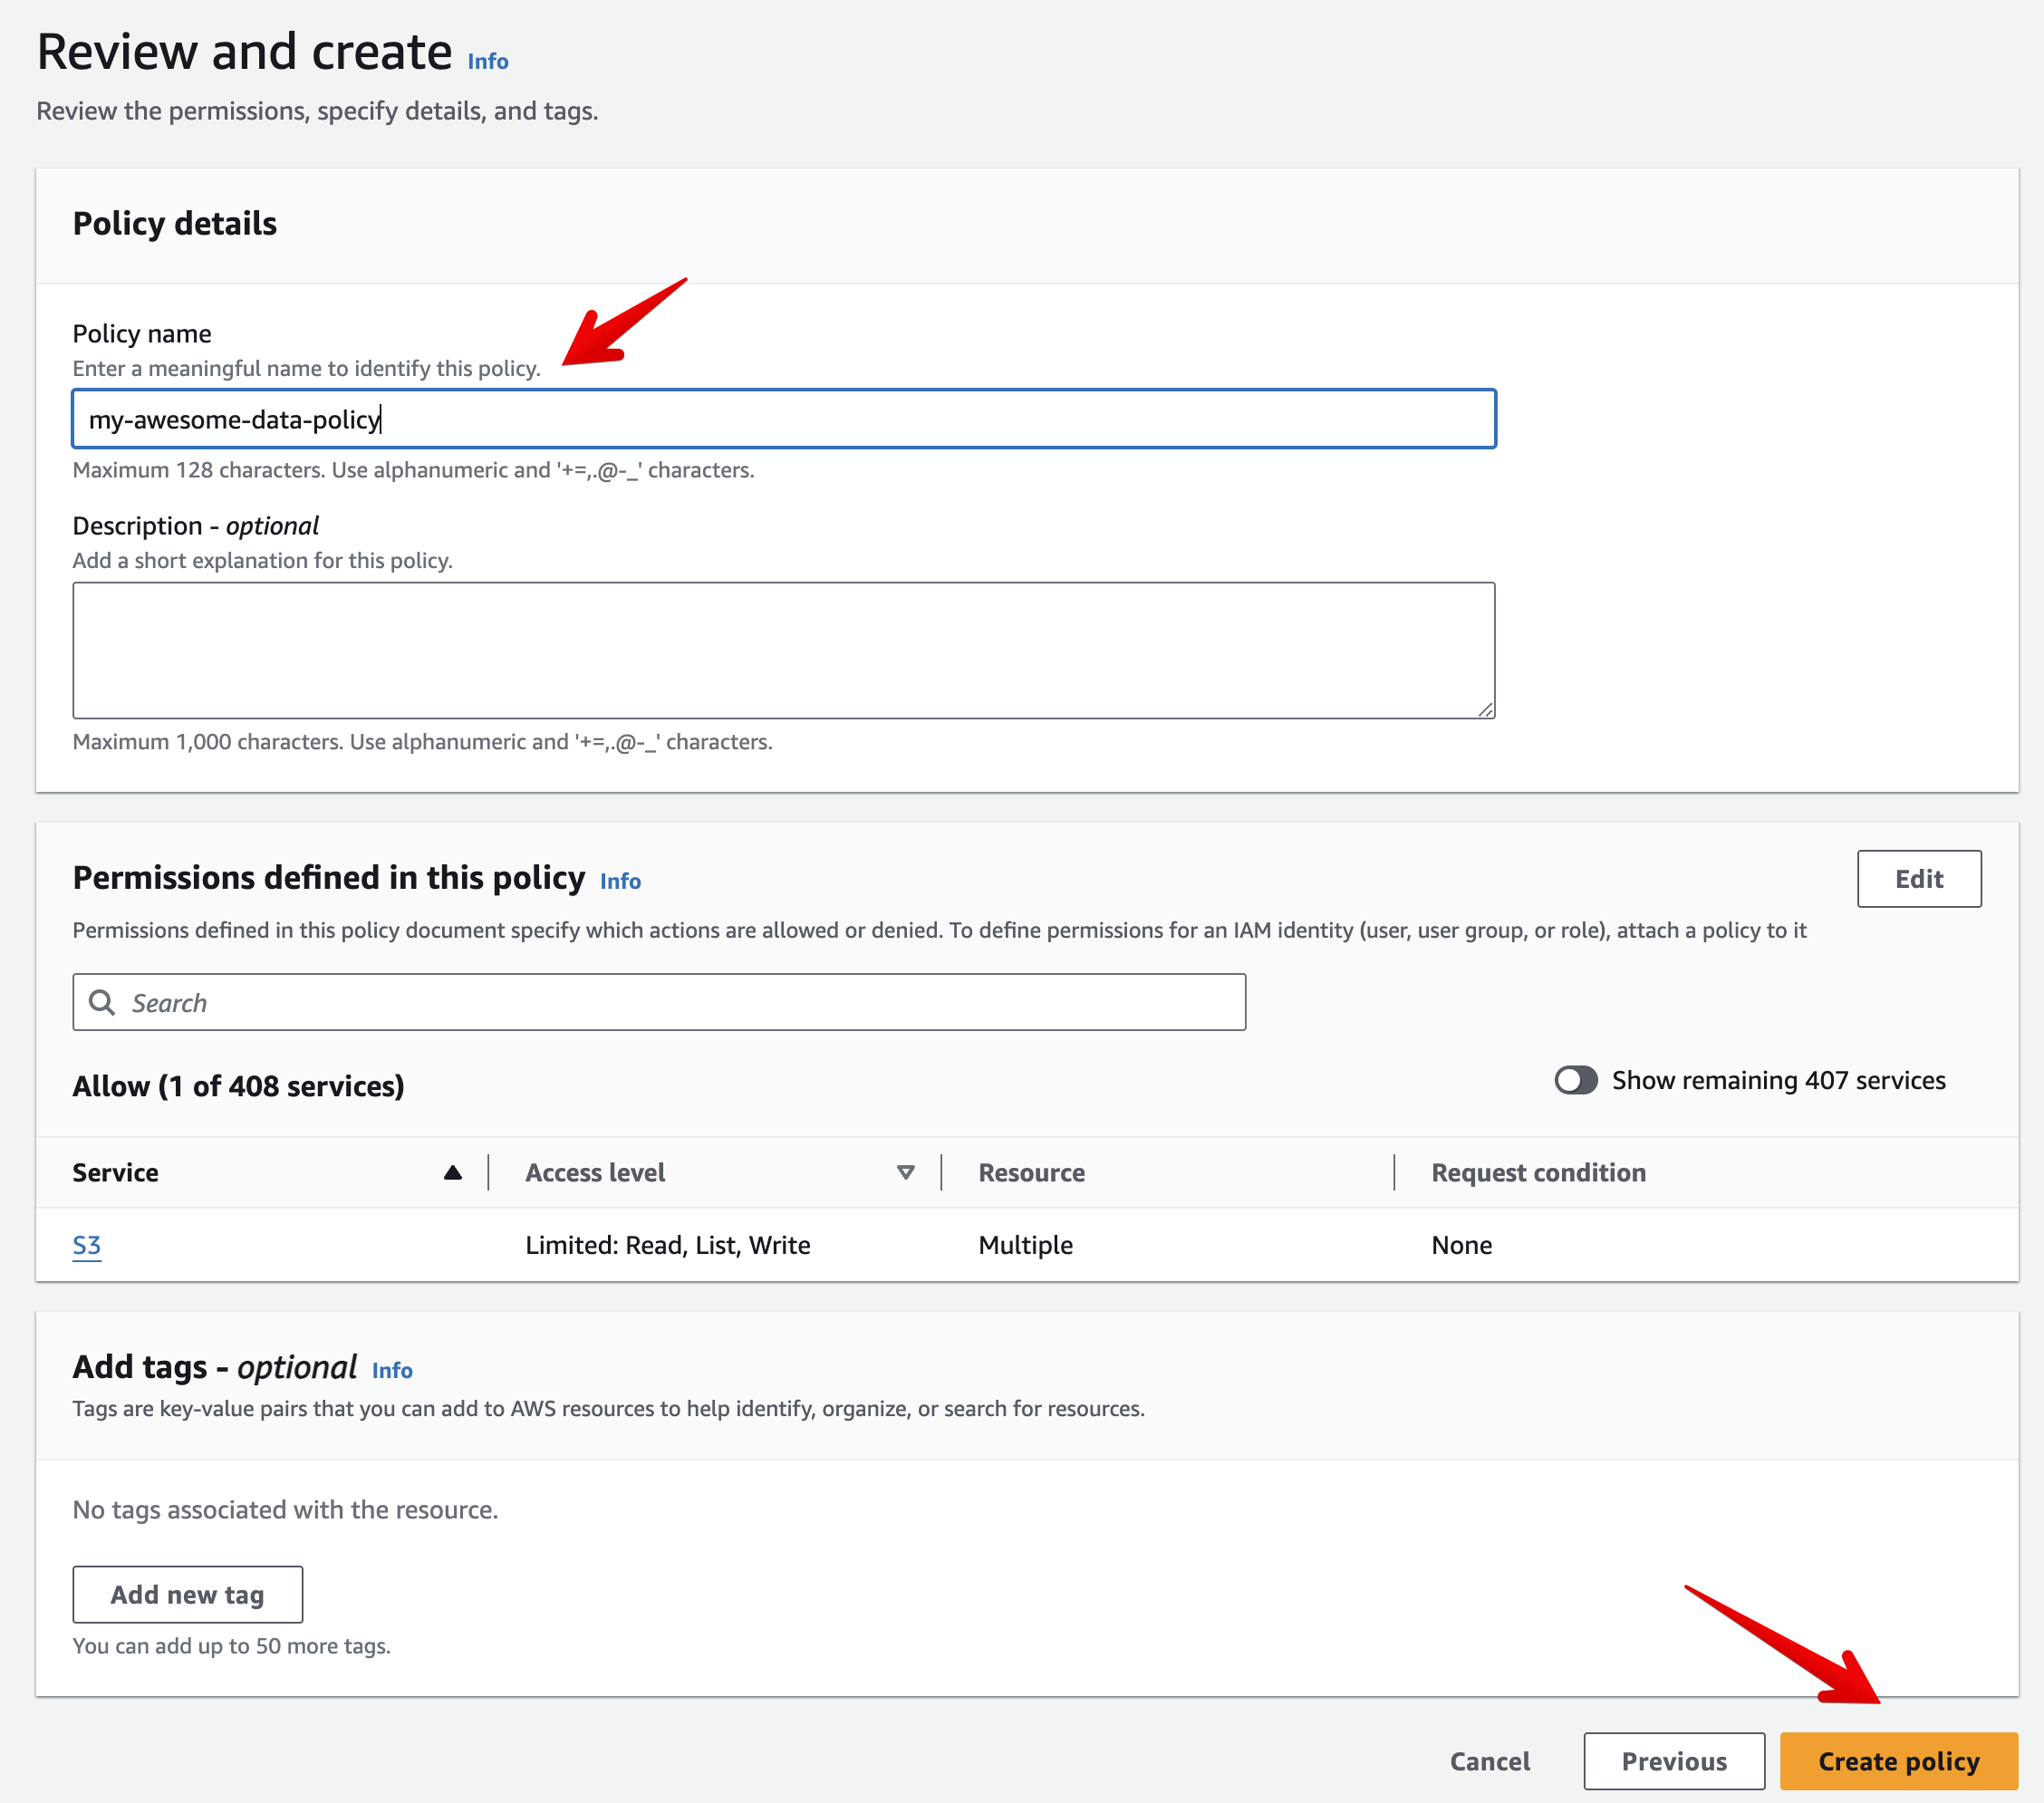
- Click Next, set a Policy name and click Create policy
Step 3 - Choose an authentication mode
There are two methods of authentication:
- The "Cross Account Role" (Step 4) method is prefered and recommended by AWS. It works by us "assuming" a Role you create in your AWS account.
- The "Access Key" (Step 5) method works by creating an IAM User with access to the AWS resource, and granting us the Access Key ID and Secret Access Key parameters.
Step 4 - Cross Account Role (Auth Method 1 - Preferred)
-
In the setup tab of your connector, select the "Cross Accont Role" method, and copy the External ID value
-
In your AWS Console, go to IAM. In the menu on the left, click Roles.
-
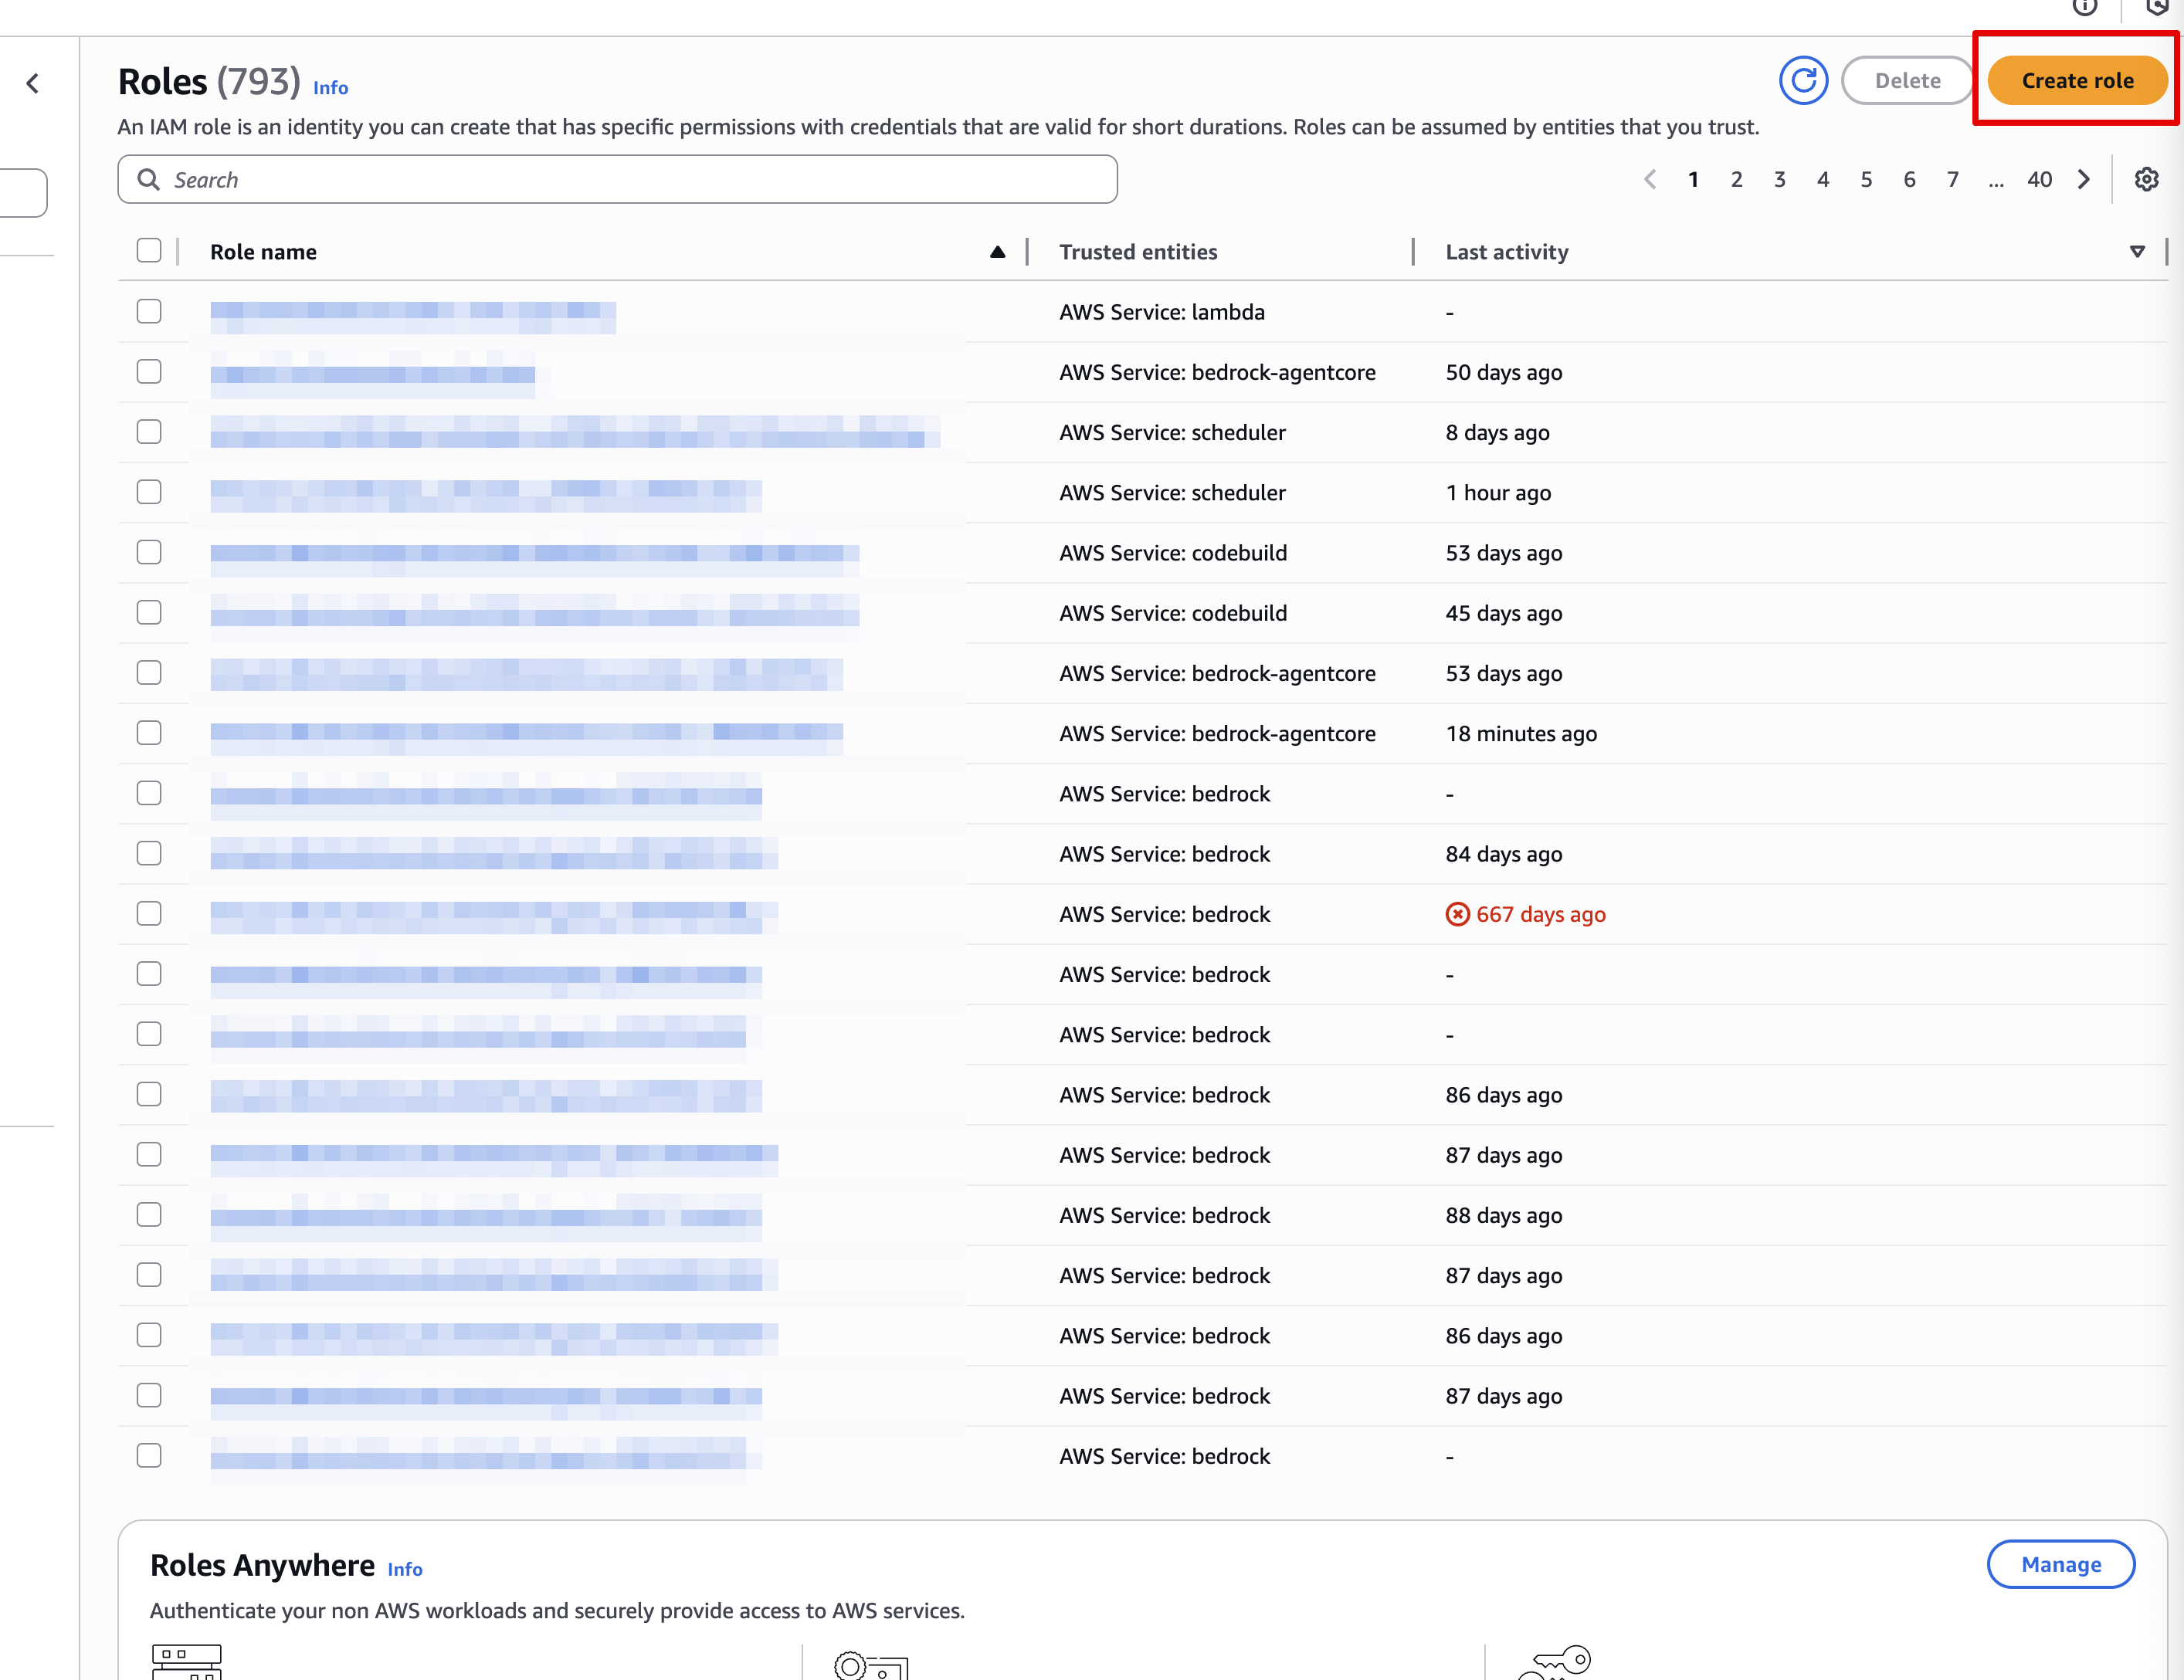
Click Create role
-
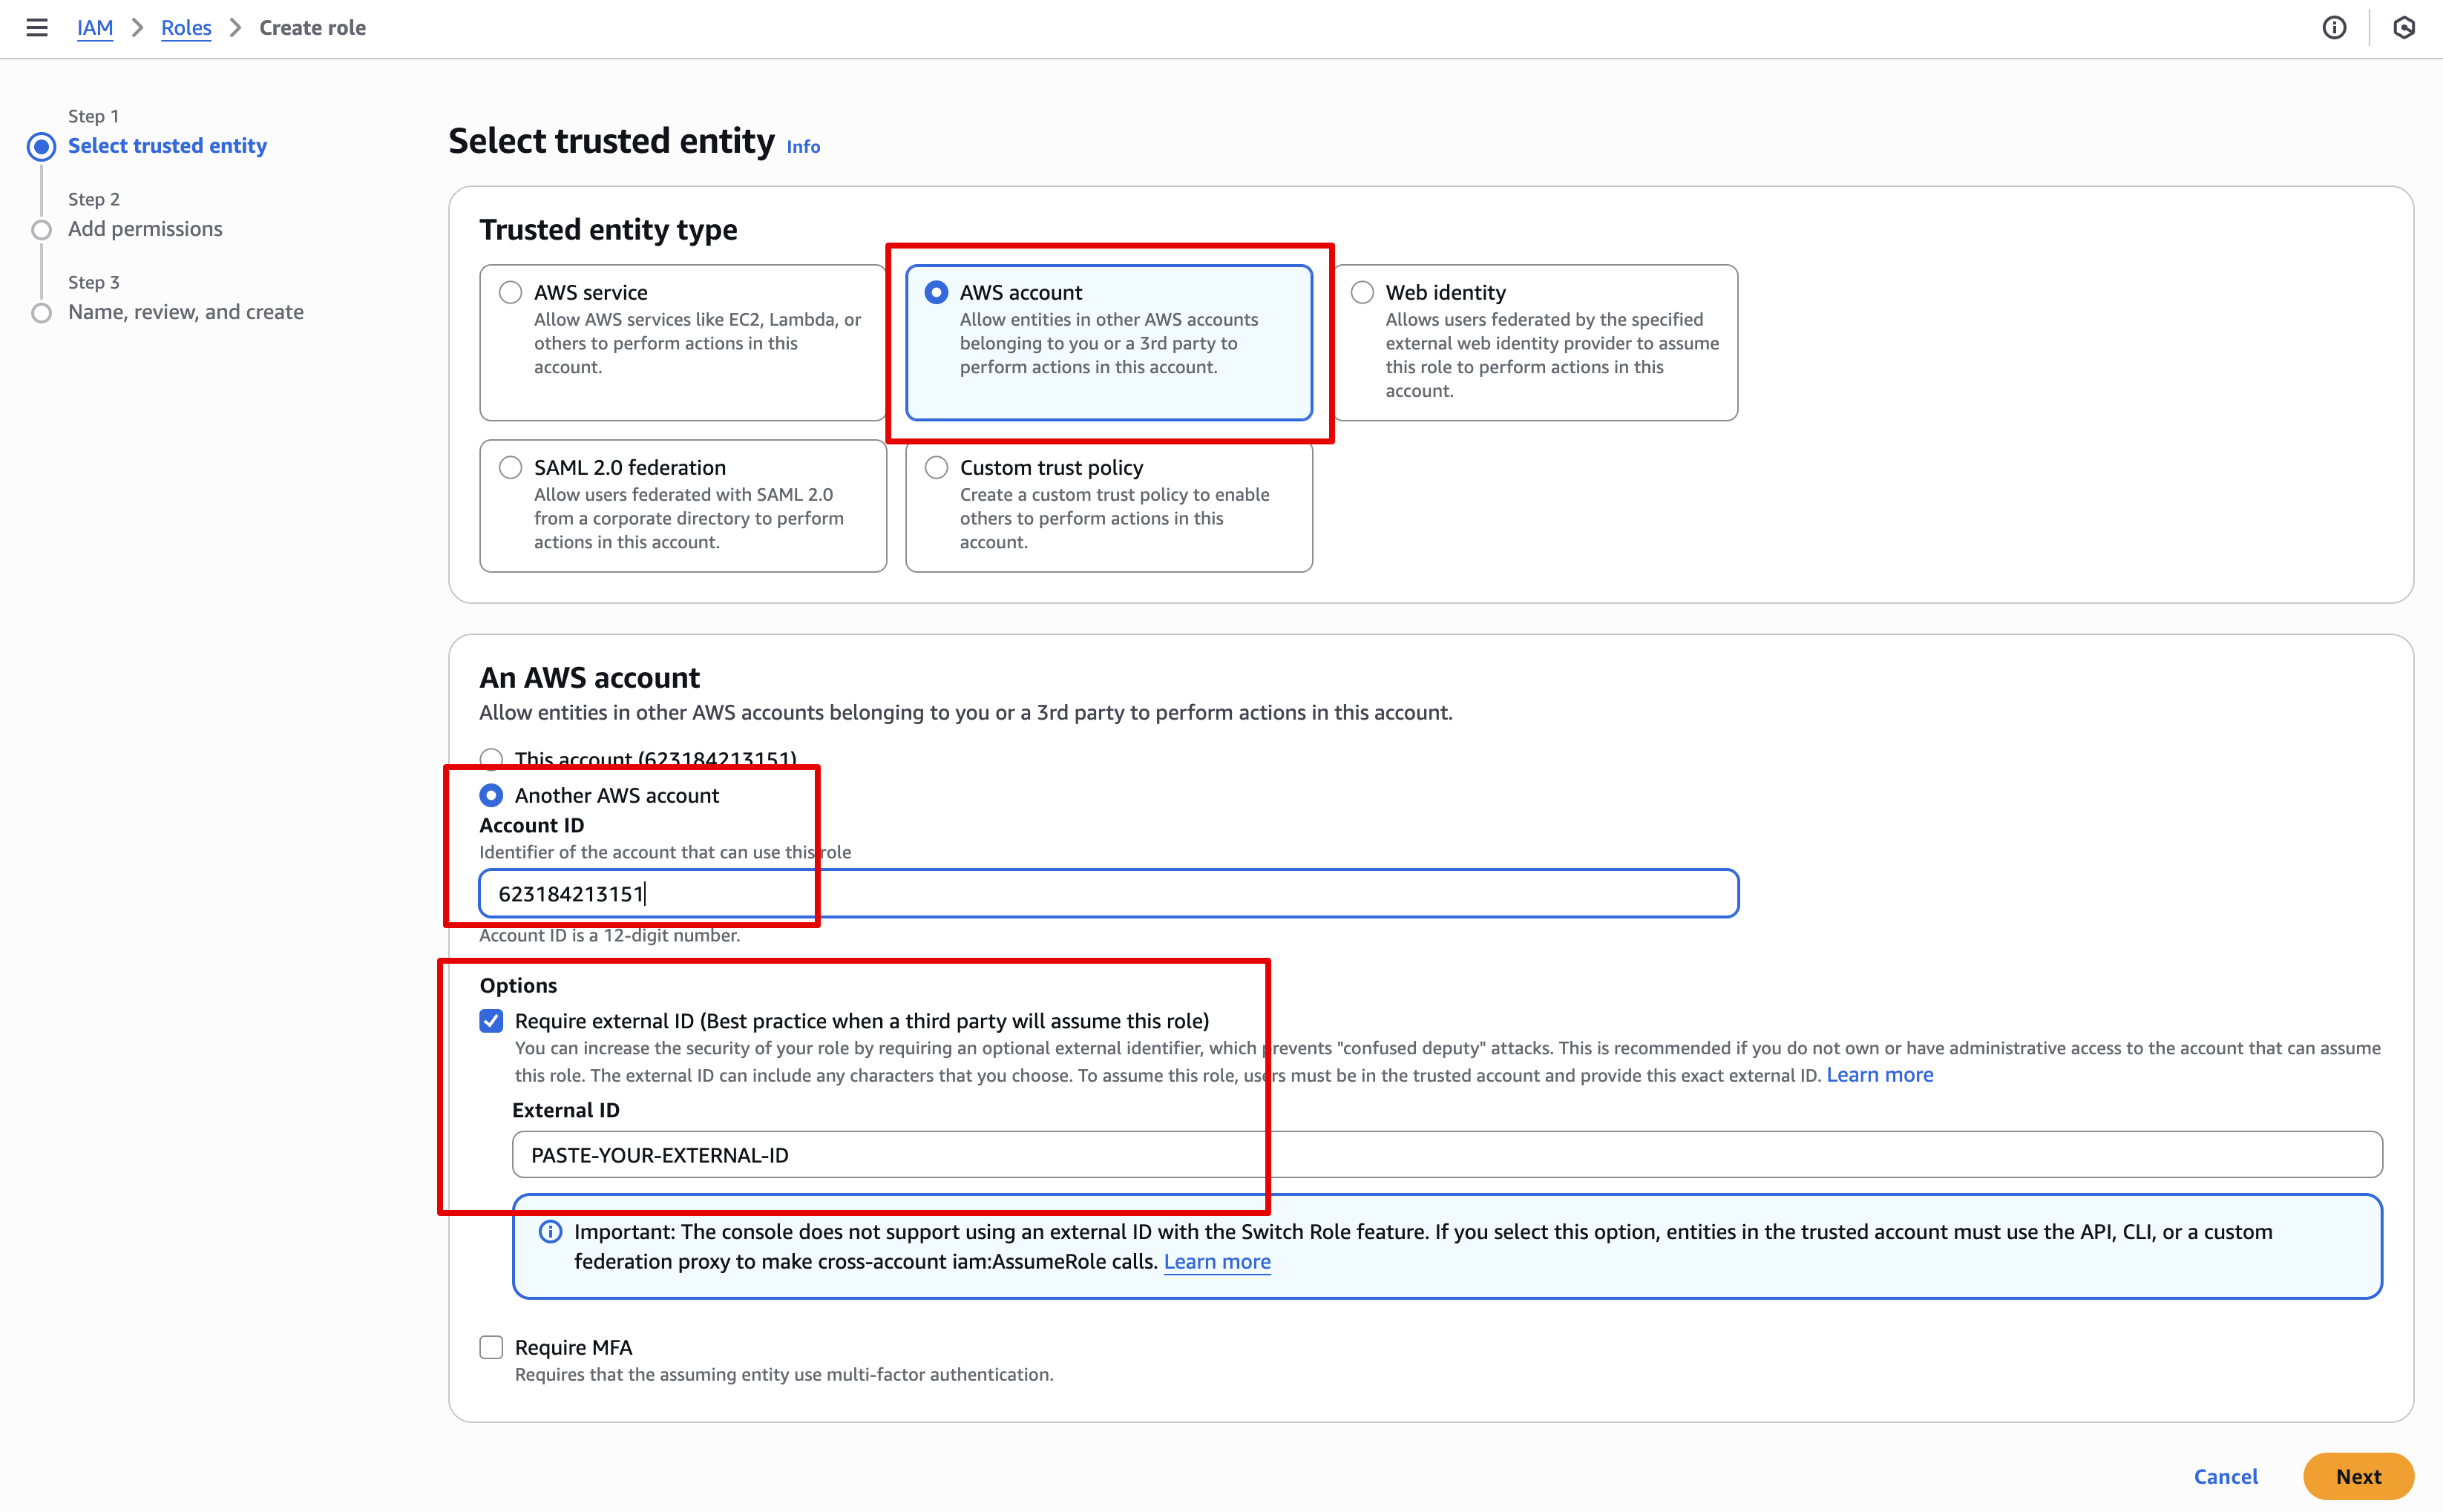
Choose AWS account
-
Select the "Another AWS account" option, and type in this Account ID:
623184213151 -
In Options - enable Require external ID and paste the External ID provided to you in the Setup tab of the connector
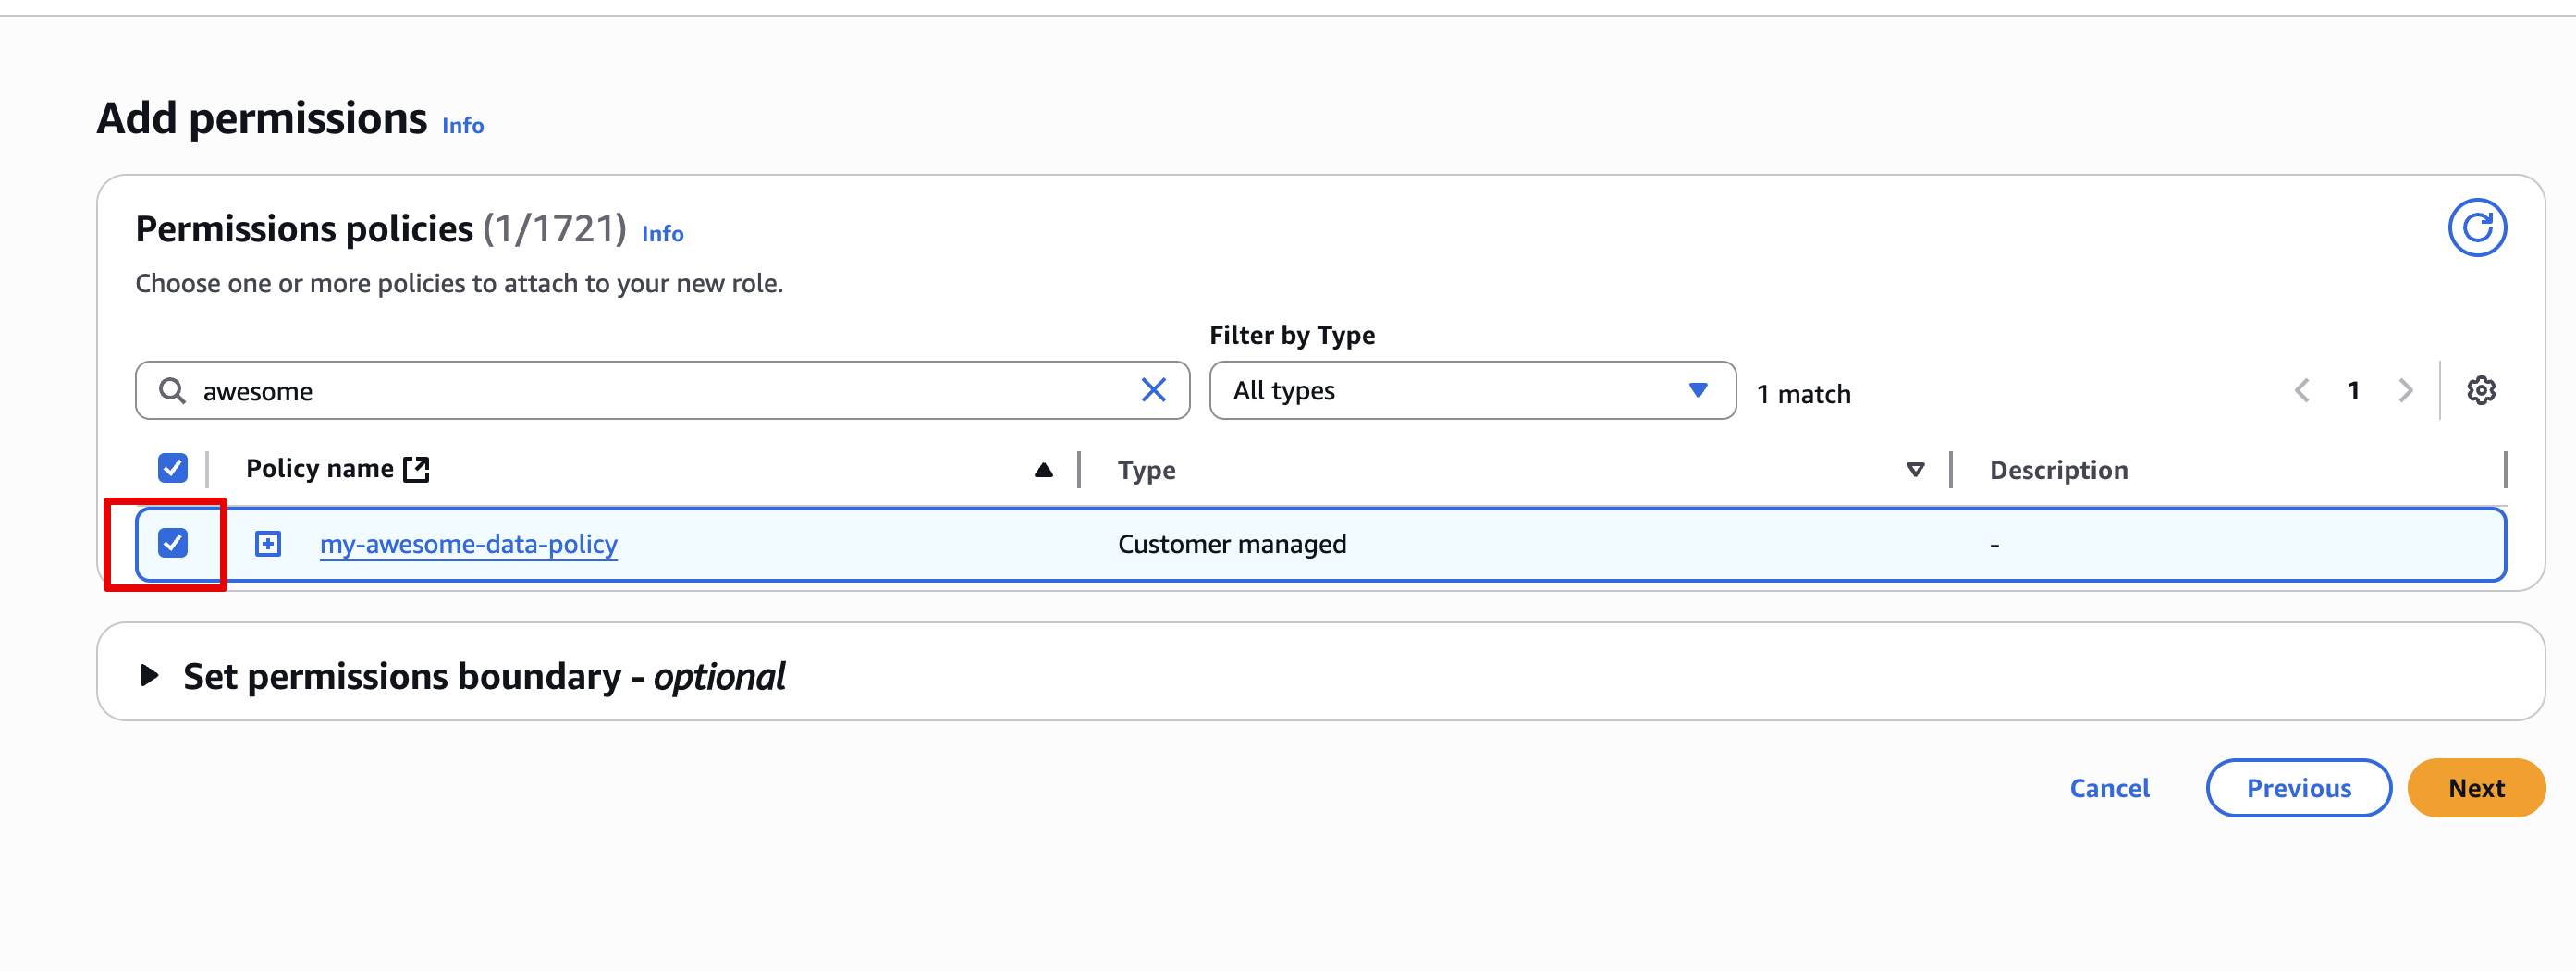
- Find the permission policy you created in Step 2 and select it
- Give the role a meaningful name and click Create role. For reference your
Trust policyshould look like this:
{
    "Version": "2012-10-17",
    "Statement": [
        {
            "Effect": "Allow",
            "Action": "sts:AssumeRole",
            "Principal": {
                "AWS": "623184213151"
            },
            "Condition": {
                "StringEquals": {
                    "sts:ExternalId": "YOUR-EXTERNAL-ID-HERE"
                }
            }
        }
    ]
}
Step 5 - Access Key (Auth Method 2)
- In the setup tab of your connector, select the "Access Key" method
2
Configuration
Provide the connector configuration in your source definition. The S3 connector reads objects from a bucket using a key_template that can point to:
-
A single, exact object key
-
A prefix (to read multiple objects under a “folder”)
-
A date-partitioned layout (to read objects whose keys include date placeholders)
-
bucket
The S3 bucket name. -
key_template
The object key, prefix, or template used to locate files in the bucket.Supported placeholders:
{stream_name}— replaced with the stream name{connection_id}— replaced with the numeric connection id- Date placeholders — used to match files across a date range (see below)
{extension}— replaced with the file extension for the selected output format (for example,jsonl,csv,parquet)
Static keys / prefixes (no date placeholders)
Ifkey_templatecontains no date placeholders, the connector treats it as “static”:- If it resolves to an exact key that exists, that single object is read.
- Otherwise, it is treated as a prefix and all objects under that prefix are listed and read.
- If the template still contains unresolved placeholders (for example,
{extension}), the connector lists using the portion of the key before the first{as the prefix.
Examples:
bucket: my-bucket
key_template: exports/{stream_name}.jsonlbucket: my-bucket
key_template: exports/{stream_name}/Date-partitioned templates
Ifkey_templateincludes any date placeholders, the connector lists objects using the portion of the template before the first date placeholder as the S3 listing prefix, then filters the results to the requested date range.Example:
bucket: my-bucket
key_template: exports/{stream_name}/dt={YYYY}-{MM}-{DD}/data.{extension}Preventing overwrites
If your run is configured to prevent overwriting existing files, the connector will fail the upload when the resolved S3 key already exists. Ensure yourkey_templateproduces unique keys per run (for example, by including a date partition in the path).
Optional
-
output_format
The expected file format for objects matched bykey_template. -
compress
Whether the matched objects are compressed.
Notes
-
If your
key_templatedoes not include any date placeholders, the connector treats it as a static key:- It first resolves
{stream_name}and{connection_id}. - If the resolved value still contains unresolved placeholders (for example,
{extension}), the connector treats everything before the first{as a prefix and lists all objects under that prefix. - Otherwise, it checks for an exact object match at
s3://<bucket>/<resolved_key>. If no exact object exists, it falls back to listing objects using the resolved key as a prefix.
- It first resolves
-
If your
key_templatedoes include date placeholders, the connector lists objects using the portion of the template before the first date placeholder as the S3 prefix, then filters the results to the requested date range. -
Incremental behavior depends on how the connector is configured:
- By default, incremental syncs use the date placeholders in
key_template(when present) to bound which objects are considered for a given run. - The connector also supports incremental syncs based on each object’s LastModified timestamp. This behavior is controlled by an internal/advanced setting and is not currently documented for public use.
- By default, incremental syncs use the date placeholders in
Troubleshooting
-
Upload fails because the destination file already exists
If your run is configured to prevent overwriting existing files, the S3 destination will error when the resolvedkeypoints to an object that already exists in the bucket. This commonly happens when:- You rerun the same stream with an unchanged
keytemplate (for example, a static path likeexports/data.jsonl). - Your
keytemplate doesn’t include a unique value per run/partition (such as a timestamp, run ID, or cursor-based partition).
How to fix
- Update your
keytemplate to produce unique object keys per run or per partition (for example, include date partitions and/or a run identifier). - Alternatively, delete or move the existing object(s) in S3 before rerunning.
- You rerun the same stream with an unchanged