Snowflake
Overview
Extract connects to Snowflake as a data source, enabling you to extract data from your Snowflake data warehouse using SQL queries. This connector leverages Snowflake's SQL API to execute queries and retrieve data efficiently.
How Extract Queries Snowflake
Extract uses the Snowflake SQL API, a REST API that provides programmatic access to execute SQL statements and retrieve results. This approach offers several advantages:
- Secure authentication via RSA key pair authentication
- Efficient data retrieval with automatic result partitioning
- Standard SQL support for queries and data management operations
- Network policy compliance to ensure secure access
Deterministic timestamp/date output formats
When executing queries via the SQL API, Extract sets session parameters to ensure deterministic, readable string formats for date/time values (rather than provider-specific or locale-dependent representations). In particular, Extract configures:
TIMEZONE = UTCDATE_OUTPUT_FORMAT = YYYY-MM-DDTIME_OUTPUT_FORMAT = HH24:MI:SS.FFTIMESTAMP_NTZ_OUTPUT_FORMAT = YYYY-MM-DD"T"HH24:MI:SS.FF9TIMESTAMP_LTZ_OUTPUT_FORMAT = YYYY-MM-DD"T"HH24:MI:SS.FF9ZTIMESTAMP_TZ_OUTPUT_FORMAT = YYYY-MM-DD"T"HH24:MI:SS.FF9TZH:TZM
This makes extracted results consistent across runs and environments.
Prerequisites
Before configuring the Snowflake source connector, ensure you have:
- A Snowflake account with
ACCOUNTADMINrole privileges (required to create a service account) - Access to execute SQL queries in your Snowflake instance
- OpenSSL installed on your local machine for key generation
- Network access to your Snowflake instance from Extract's servers
Setup Guide
Step 1: Access the Snowflake SQL Worksheet
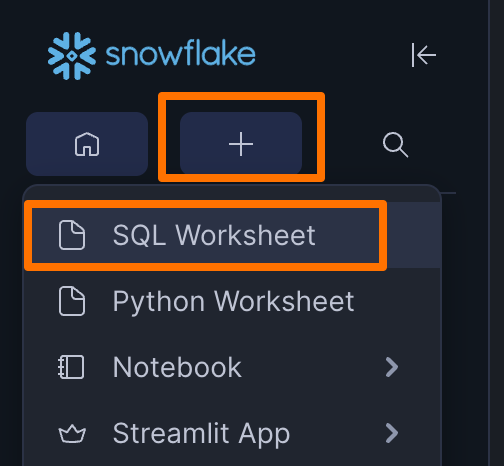
Open a SQL worksheet in your Snowflake instance. You can use the Snowflake web UI or any SQL editor that connects to Snowflake.
To open a SQL worksheet in the Snowflake UI:
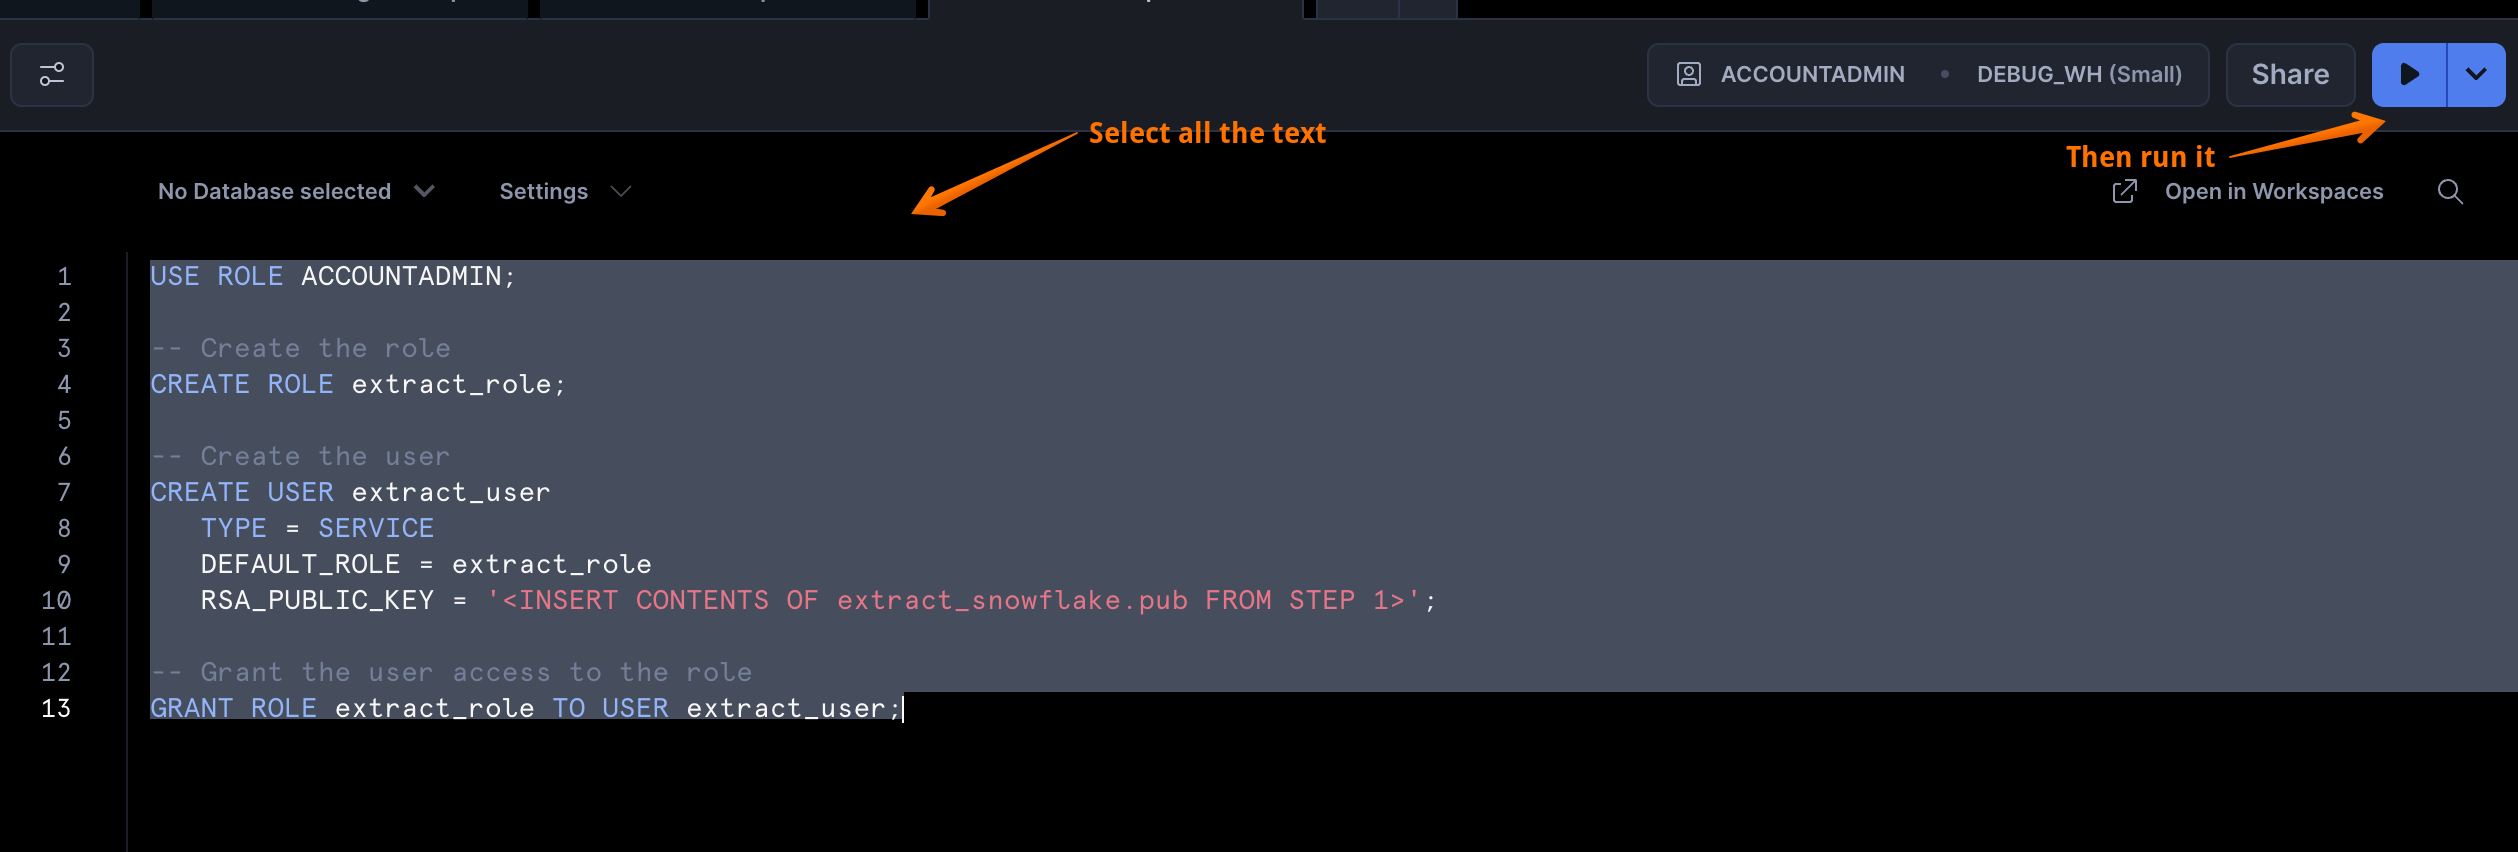
When executing SQL commands in Snowflake's web UI, you must select the statements you want to run before clicking the execute button. Ensure you select all relevant rows when copy-pasting the SQL commands provided below.
Step 2: Generate RSA Key Pair for Authentication
Extract uses key pair authentication for secure access to Snowflake. Extract accepts both PKCS#8 and PKCS#1 PEM private keys, but Snowflake recommends PKCS#8 and that is the preferred format for new setups. Generate a PKCS#8 private key and matching public key using OpenSSL:
openssl genrsa 2048 | openssl pkcs8 -topk8 -v2 des3 -inform PEM -out extract_snowflake.p8
openssl rsa -in extract_snowflake.p8 -pubout -out extract_snowflake.pub
These commands will create:
extract_snowflake.p8- PKCS#8 private key (preferred, to be provided to Extract)extract_snowflake.pub- Public key (to be registered in Snowflake)
If you already have a PKCS#1 PEM private key, such as a file that starts with -----BEGIN RSA PRIVATE KEY-----, Extract will still accept it. PKCS#8 keys usually start with -----BEGIN PRIVATE KEY----- or -----BEGIN ENCRYPTED PRIVATE KEY-----.
Keep your private key secure and never share it publicly. The private key will be encrypted and stored securely within Extract.
Step 3: Create a Dedicated Service Account
Create a dedicated Snowflake role and service user for Extract with appropriate permissions:
USE ROLE ACCOUNTADMIN;

-- Create a dedicated role for Extract
CREATE ROLE extract_role;

-- Create a service user with key pair authentication
CREATE USER extract_user
   TYPE = SERVICE
   DEFAULT_ROLE = extract_role
   RSA_PUBLIC_KEY = '<INSERT CONTENTS OF extract_snowflake.pub>';

-- Assign the role to the user
GRANT ROLE extract_role TO USER extract_user;
Replace <INSERT CONTENTS OF extract_snowflake.pub> with the contents of your public key file. Copy only the key content between the -----BEGIN PUBLIC KEY----- and -----END PUBLIC KEY----- markers, excluding those lines.
Step 4: Grant Database and Warehouse Access
Grant the Extract role access to the databases, schemas, and warehouse you want to query:
USE ROLE ACCOUNTADMIN;

-- Grant warehouse usage
GRANT USAGE ON WAREHOUSE <YOUR_WAREHOUSE> TO ROLE extract_role;

-- Grant database and schema access
GRANT USAGE ON DATABASE <YOUR_DATABASE> TO ROLE extract_role;
GRANT USAGE ON SCHEMA <YOUR_DATABASE>.<YOUR_SCHEMA> TO ROLE extract_role;

-- Grant SELECT permissions on tables/views
GRANT SELECT ON ALL TABLES IN SCHEMA <YOUR_DATABASE>.<YOUR_SCHEMA> TO ROLE extract_role;
GRANT SELECT ON FUTURE TABLES IN SCHEMA <YOUR_DATABASE>.<YOUR_SCHEMA> TO ROLE extract_role;
Adjust the permissions based on your security requirements. Grant access only to the specific databases, schemas, and tables that Extract needs to query.
Step 5 (Optional): Configure Network Policies
If your Snowflake instance has network policies configured, add Extract's server IP addresses to the allowlist:
Extract Server IPs:
3.134.124.160/323.150.64.207/3244.232.26.19/3254.214.149.234/32
Update your network policy using:
ALTER NETWORK POLICY <YOUR_POLICY_NAME>
  SET ALLOWED_IP_LIST = (
    '3.134.124.160/32',
    '3.150.64.207/32',
    '44.232.26.19/32',
    '54.214.149.234/32',
    '<OTHER_EXISTING_IPS>'
  );
Step 6: Configure the Snowflake Source in Extract
In the Extract platform, configure the Snowflake source connector with the following parameters:
Connection Settings:
-
Account Identifier - Your Snowflake account identifier (the portion before
.snowflakecomputing.comin your Snowflake URL). For example, if your URL ishttps://abc123.snowflakecomputing.com, useabc123.
=======
-
Username - The service user created in Step 3 (default:
extract_user) -
Private Key - The complete contents of the private key file generated in Step 2, including the BEGIN and END markers. PKCS#8 is preferred, but PKCS#1 PEM keys are also accepted.
-
Private Key Passphrase - If you encrypted your private key with a passphrase, enter it here. Otherwise, leave this field empty.
-
Warehouse - The name of the Snowflake warehouse to use for query execution (e.g.,
COMPUTE_WH)
Dataset Configuration:
- Datasets - Configure your SQL queries that will be executed as data streams. Each dataset represents a SQL query whose results will be extracted.
Once configured, click Save and monitor the connection logs to verify successful authentication and data extraction.
Data type handling notes
When Extract materializes query results into destination tables (for example, when syncing into Snowflake), it maps schema field types to Snowflake column types as follows:
- string
- no format:
VARCHAR format: date:DATEformat: date-time:TIMESTAMP_TZ(optionally with precision; see below)
- no format:
- number
- default:
FLOAT8 - if configured to cast to decimal:
DECIMAL
- default:
- integer:
BIGINT - boolean:
BOOLEAN - array:
ARRAY - json:
VARIANT
Timestamp precision for date-time
For string fields with format: date-time, Extract can optionally set Snowflake timestamp precision:
ts_precision: 3→TIMESTAMP_TZ(3)ts_precision: 6→TIMESTAMP_TZ(6)ts_precision: 9→TIMESTAMP_TZ(9)- any other value / unset →
TIMESTAMP_TZ
Decimal vs float for number
For number fields, Extract defaults to FLOAT8. If your pipeline requires exact numeric representation (for example, currency), configure the field to cast to decimal so it is created as DECIMAL in Snowflake.
Configuration
The Snowflake source supports the following configuration parameters:
| Parameter | Type | Required | Description |
|---|---|---|---|
account_identifier | string | Yes | Your Snowflake account identifier (for example, xy12345.us-east-1). |
username | string | Yes | Snowflake user to authenticate as. |
private_key | string | Yes | RSA private key (PEM) used for key-pair authentication. |
private_key_passphrase | string | No | Passphrase for the private key, if encrypted. |
warehouse | string | Yes | Warehouse to use for running queries. |
database | string | Yes | Database to read from. |
schema | string | No | Schema to read from. If provided, it will be uppercased before use. |
role | string | No | Role to assume for the session. |
proxy_url | string | No | Optional proxy URL to use for outbound connections. |
no_auto_schema_creation | boolean | No | When true, Extract will not attempt to automatically create the target schema if it does not exist. Default: false. |
Notes:
- If you set
schema, Extract will use the uppercased value (Snowflake object names are commonly stored in uppercase unless quoted). no_auto_schema_creationis useful in environments where schema creation is restricted and schemas are managed separately (for example, via IaC or DBA processes).
Troubleshooting
If you encounter connection issues:
- Authentication Failures - Verify that the public key is correctly registered in Snowflake and the private key matches
- **